Table of Contents
Key takeaways
- Facebook advertising lets businesses target over 3 billion monthly active users with formats ranging from image and video ads to AI-optimized Advantage+ campaigns.
- The typical cost per click for Facebook ads in 2026 ranges from $0.50 to $2.00, though costs vary significantly by industry and objective.
- Setting up a Facebook ad campaign in Meta Ads Manager takes 8 steps.
- Enterprise teams can manage Facebook ads alongside organic content using Hootsuite to compare paid and organic performance, track return on ad spend, and measure cost per acquisition in one dashboard.
What is Facebook advertising?
Facebook advertising is the practice of running paid promotions across Meta’s family of apps, including Facebook, Instagram, Messenger, and the Audience Network, to reach specific audiences with text, image, and video creative. It gives businesses a way to put their message in front of the right people at scale, with precise targeting and measurable results.
Meta’s ad audience is one of the largest in digital marketing. Meta’s own reporting shows the company reaches billions of people every month across its apps, which gives advertisers an unmatched pool of potential customers.
Facebook ads run through an auction system. When you set up a campaign, you tell Meta your objective, audience, and budget. Meta then decides which ads to show each person based on a mix of your bid, the estimated action rate, and ad quality. You don’t pay more than you need to win the auction, and Facebook’s algorithm works to deliver your ad to the people most likely to act on it.
In short, Facebook advertising combines massive reach with granular control, making it a core channel for marketers of every size.
Bonus: Get the Facebook advertising cheat sheet for 2022. The free resource includes key audience insights, recommended ad types, and tips for success.
How much does Facebook advertising cost in 2026?
Facebook advertising costs vary widely, but the typical cost per click in 2026 falls between $0.50 and $2.00, depending on your industry, audience, and campaign objective. Costs are shaped by how competitive your audience is, the quality of your creative, and the time of year you advertise.
Here’s a general look at typical costs by campaign objective, based on industry benchmark data:
Campaign objective | Typical cost per click (CPC) | Typical cost per 1,000 impressions (CPM) | Typical cost per lead (CPL) |
|---|---|---|---|
Awareness | $0.40 to $0.90 | $5 to $9 | N/A |
Traffic | $0.50 to $1.50 | $7 to $12 | N/A |
Engagement | $0.30 to $1.00 | $6 to $10 | N/A |
Leads | $1.00 to $2.50 | $9 to $15 | $5 to $25 |
Sales | $0.80 to $2.00 | $10 to $18 | $10 to $40 |
These ranges are benchmarks, not guarantees. Your actual costs depend on factors specific to your account and audience. For a deeper breakdown of how clicks are priced, see our guide on what you’ll pay per click.
The takeaway: There’s no single price for Facebook ads, so plan your budget around your objective and test to find what works.
What affects your Facebook ad costs?
Several factors influence what you’ll pay to run Facebook ads. Understanding them helps you control spend and improve efficiency.
- Audience size and competition: Broad, in-demand audiences cost more because more advertisers are bidding for them, with the average price per ad up 9% year-over-year.
- Ad quality and relevance: Higher-quality, more relevant ads win auctions at lower costs.
- Placement: Some placements, like Feeds, tend to cost more than others, like Audience Network.
- Time of year: Costs spike during high-demand periods like the holiday shopping season.
- Industry: Competitive industries such as finance and insurance typically see higher costs per click.
Is $5 or $10 a day enough for Facebook ads?
Yes, $5 or $10 a day is enough to run Facebook ads, but what you get from that budget depends on your goals. A $5 daily budget works well for small-scale testing, local campaigns, or gathering early audience data. A $10 daily budget gives Meta’s algorithm more data to optimize delivery and can produce meaningful results for small-to-mid-sized campaigns.
Enterprise campaigns aiming for significant reach or conversions typically require substantially more. The key is to start with a budget that lets you collect enough data to optimize, then scale what works.
Why advertise on Facebook?
Advertising on Facebook gives businesses access to massive reach, precise targeting, flexible budgets, and clear performance data, all in one place. For marketing leaders, that combination makes it one of the most efficient channels for driving measurable growth.
Here are the key benefits:
- Massive reach: Connect with billions of active users across Facebook, Instagram, and Messenger — 71% of U.S. adults use Facebook alone.
- Granular targeting: Reach people by demographics, interests, behaviors, and custom data from your CRM.
- Flexible budgets: Start with a few dollars a day or scale to enterprise-level spend.
- Measurable ROI: Track conversions, cost per acquisition, and return on ad spend in real time.
- Multiple formats: Choose from image, video, carousel, and AI-optimized campaigns to match any objective.
- Enterprise scalability: Run multi-brand, multi-region campaigns and integrate with your existing marketing stack.
What types of Facebook ads can you run?
Meta offers several ad formats, each suited to different goals and stages of the funnel. Below is a look at the main Facebook ad types and when to use each one.
What are image ads?
Image ads are Facebook’s most basic ad format. They let businesses promote their products, services, or brands using single images. Image ads can be used across different ad types, placements, and aspect ratios.
Image ads are a good fit for campaigns with strong, static visual content. These images could be made from illustrations, design, or photography.
You can create one with just a few clicks by boosting an existing post with an image from your Facebook Page.
Image ads are simple to make and can successfully display your offering if you use high-quality imagery. They’re suitable for any stage of the sales funnel — whether you want to boost brand awareness or promote a new product launch to increase sales.
Image ads can be limiting as you only have a single image to convey your message. If you need to display multiple products or show how your product works, there are better choices than the single-image ad format.

Pro tip: Pay attention to image ad specs and ratios so your product doesn’t get cut off or stretched.
What are video ads?
Just like image ads, video ads on Facebook let businesses use a single video to showcase their products, services, or brand.
They’re especially helpful for product demos, tutorials, and showcasing moving elements.
Video can be up to 241 minutes long, but that doesn’t mean you should use that time! Shorter videos are usually more engaging. Facebook recommends sticking to videos under 15 seconds.
The downside of video ads is that they’re time-consuming and can become expensive. A carousel or image ad may be a better fit for simple messages or products that don’t require demos. In short, video ads work best for product demos and tutorials but require more production investment.
What are Stories ads?
Stories ads take advantage of mobile’s vertical orientation with a full-screen format that allows you to maximize screen real estate without expecting viewers to turn their screens.
And, in the US, 62% of people said they became more interested in a brand or product after seeing it in a Story. It makes sense that there are four million advertisers taking advantage of Stories ads every month.

Stories provide more creative freedom than regular image or video ads. Businesses can play around with emojis, stickers, filters, video effects, and even augmented reality.
What are carousel ads?
Carousel ads showcase up to ten images or videos that users can click through. Each has its own headline, description, or link.
Carousels are a great choice for displaying a series of different products. Each image in the carousel can even have its own landing page that’s specifically built for that product or service.
This Facebook ad format is also helpful for guiding users through a process or showcasing a series of related products by separating each part across different sections of your carousel.

Source: Kits on Facebook
What are collection ads?
Collection ads are kind of like immersive carousels — taking the user experience a step up. These ads are like mobile window-shopping experiences where users can flick through your product lineup.
More customizable than Carousels, they’re also full-screen. Users can purchase products directly from the Collection ad.
Businesses can also choose to let Facebook algorithms select which products from your catalog are included for each user.
When someone taps your Collection ad, they open an Instant Experience, a full-screen, mobile-only landing experience (formerly known as Canvas) where users can tap through images, shift the screen, and zoom in and out of content. Facebook suggests using five to seven images and videos for the best chances of engagement.
Collection ads are a great choice for large businesses that sell a variety of products and services. Smaller businesses with a more limited product line may be better suited to other ad types like Carousels.
What are Messenger ads?
Messenger ads show up in Facebook Messenger. Since it’s where people spend time chatting with friends and family, Messenger ads feel more personal than scrolling through image or video ads.
People see your Messenger ads among their conversations and can tap to start a conversation with your brand. These ads are a great way of getting people to interact with your brand.
For smaller businesses promoting local products or services, Messenger ads can help start the conversation.
What are Advantage+ Shopping campaigns?
Advantage+ Shopping campaigns are Meta’s AI-driven campaigns that automate creative selection, audience targeting, and ad placements to drive sales with less manual setup. Instead of building each element by hand, you supply your assets and goals, and Meta’s machine learning handles the optimization.
The main difference from manual campaigns is the level of automation. With Advantage+, Meta tests combinations of creative and audiences automatically, then shifts budget toward the best performers in real time, delivering a 20% lower cost per result on average. For enterprise teams running large catalogs across regions, this delivers efficiency at scale and frees up time for strategy.
Advantage+ Shopping works best when you have clear conversion goals and enough budget for the system to learn quickly. You can find current setup details in Meta’s official documentation.

How do you write effective Facebook ad copy?
Effective Facebook ad copy leads with a clear benefit, speaks directly to your audience, and ends with a strong call to action. The best copy is concise, since most people scan rather than read, and it works hand in hand with your visual.
Keep these best practices in mind:
- Lead with the benefit: Tell people what they’ll gain in the first line of primary text.
- Keep it short: Aim for primary text under 125 characters so it doesn’t get truncated, per Meta’s Ads Guide.
- Write clear headlines: Headlines under 40 characters display best across placements.
- Use one clear CTA: Tell people exactly what to do next, like “Shop now” or “Get offer.”
- Match copy to objective: Awareness copy builds interest; sales copy drives action.
- Speak to your audience: Name the problem you solve and who you solve it for.
Here’s the difference in practice. Weak copy says, “We offer great software for businesses of all sizes.” Strong copy says, “Respond to customers 2x faster. Try Hootsuite free for 30 days.”
If you’re short on ideas, Hootsuite’s OwlyWriter AI can generate ad copy variations in seconds, giving you a starting point to refine.
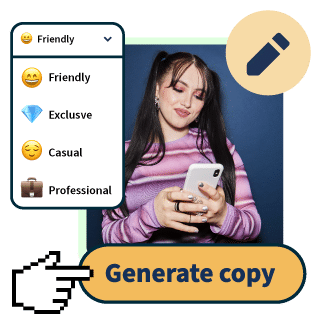
OwlyWriter AI instantly generates captions and content ideas for every social media network. It’s seriously easy.
Start your free trialHow do you set up Facebook ads in Meta Ads Manager?
You can set up a Facebook ad campaign in Meta Ads Manager in 8 steps:
- Start creating an ad
- Choose your campaign objective
- Define your campaign settings
- Set your budget
- Target your audience
- Choose your ad placements
- Create your ad
- Monitor your ad’s performance metrics
If you already have a Facebook business page (and you should), you can head straight to Meta Ads Manager (formerly Facebook Ads Manager) or Business Manager to create your Facebook ad campaign. If you don’t yet have a business page, you’ll need to create one first.
Ads Manager is the starting place for running ads on Facebook and Messenger. It’s an all-in-one tool suite for creating ads, managing where and when they’ll run, and tracking campaign performance.

Step 1: Start creating an ad
After logging into Ads Manager, you’ll see your dashboard. To create a new campaign, ad set, or ad, click the Create button.

Step 2: Choose your campaign objective
Facebook will ask you to select your campaign objective from six options.

Here’s how the campaign objectives align with business goals:
- Awareness: Introduce your brand to a new audience.
- Traffic: Drive traffic to a specific web page, app, or Facebook Page.
- Engagement: Find people most likely to take a specific action, like engage with your business or send a message.
- Leads: Get new potential customers into your sales funnel via messages, phone calls or signups.
- App promotion: Get mobile users to install your app or take a specific action within your app.
- Sales: Find people who are most interested in purchasing your product or service.
Choose a campaign objective based on your goals for this particular ad.
Step 3: Define your campaign settings
Here, you’ll name your campaign, note if there are any Special Ad Categories it falls into, and fill out the rest of the Campaign details.

If you want to set up an A/B split test, toggle on the Create A/B test button. You can choose different versions to run against this ad after it’s published.
Step 4: Set your budget
Next, click into the Ad set options. This is where you’ll decide which specific performance goal you want to reach and how much money you want to spend to get there. You can choose between a daily budget and a lifetime budget.

Daily budget runs your ad continuously throughout the day, with a minimum of $1.00 per day. A lifetime budget runs your ad for a specified time period.
Set the start and end dates if you want to schedule your ad in the future or choose to make it live right away.
You can also choose to schedule your budget in advance, in case you want to increase your spend at certain high-traffic times.
Step 5: Target your audience
When you want to dial in your ad targeting, you have a couple of options:
- Sketch out the basic details (like age, location, and language) and let Meta’s Advantage+ technology automatically find your audience, or
- Switch to Facebook’s original audience targeting options and build out your audience yourself

If you’re just getting started, we’d recommend letting Facebook’s AI do the targeting for you. According to their data, the Advantage+ audience generally offers better results for lower costs: roughly “28% lower average cost per click, lead or landing page view.”
Beyond the Advantage+ audience, you can also use custom audiences built from your website visitors, email lists, or app users, plus lookalike audiences that find new people who resemble your best customers. For a deeper look at reaching the right people, see our guide on effective targeting, which is key to maximizing ROI.
Step 6: Choose your Facebook ad placements
Next, choose where your ad appears. You can let Facebook choose automatically with Advantage+ placements or pick manually. If you’re new, start with Advantage+.

After a while, you can review your ad performance and switch to manual for better optimization. Your manual options will vary based on your chosen campaign objective but may include the following:
- Device type: Mobile, desktop, or both.
- Platform: Facebook, Instagram, Audience Network, and/or Messenger
- Placements: Feeds, Stories, Reels, in-stream (for videos), search, messages, overlay and post-loop ads on Reels, search, in-article, and apps and sites (external to Facebook).
- Specific mobile devices and operating systems: iOS, Android, feature phones, or all devices.
- Only when connected to WiFi: The ad only shows when the user’s device is connected to WiFi.
Step 7: Create your ad
You’re almost done! Next, click into the Ad options.
Choose the ad format that aligns with your campaign objectives. Then enter the ad copy and media components for your ad. The formats available will vary based on the campaign objective you selected back at the beginning of this process.
Follow the prompts and design recommendations provided by Facebook based on your chosen ad type.

Use the preview tool at the right of the page to make sure your ad looks good for all potential placements. When you’re happy with your choices, click the green Publish button to launch your ad.
Step 8: Monitor your ad’s performance metrics
Once your ad’s running, keep an eye on its performance in Ads Manager. Look for key metrics like results, reach, engagement, video views, website actions, and more. Enterprise teams should pay special attention to return on ad spend (ROAS), cost per acquisition, and frequency, since these tie directly to business impact and help you avoid overexposing the same audience.
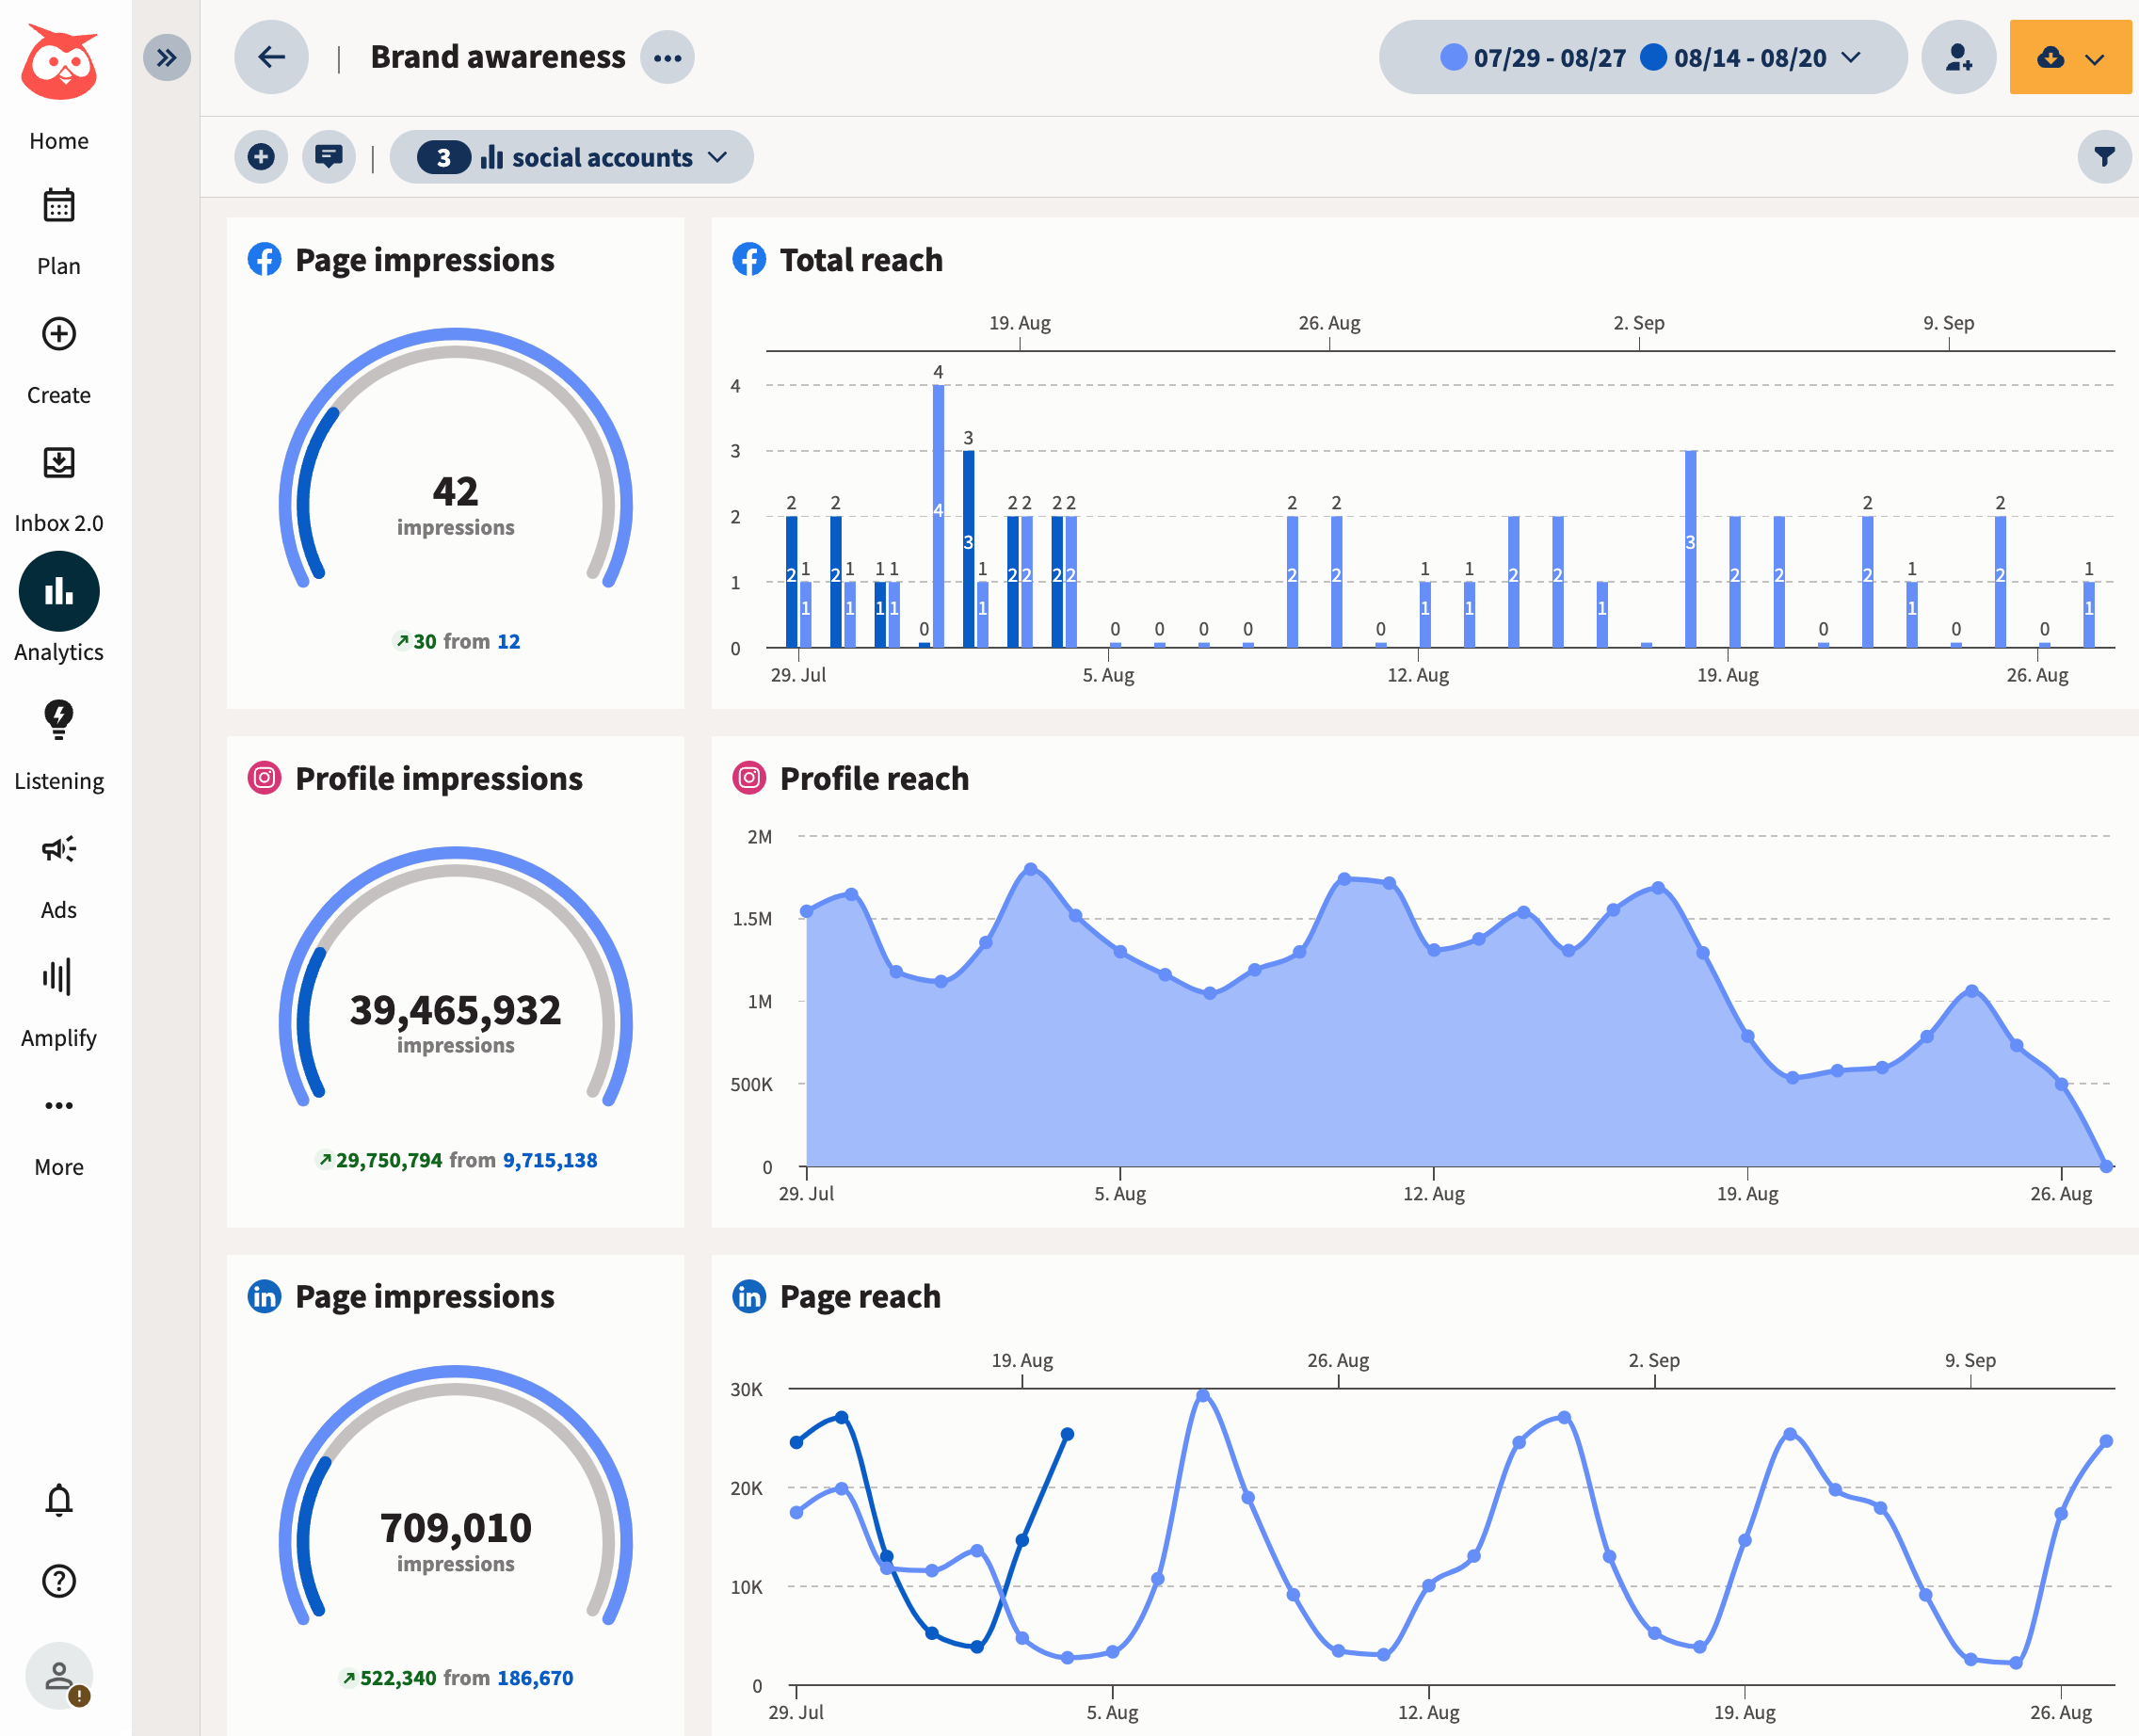
Or, you can use Hootsuite’s social advertising dashboard to better understand how all of your content is performing.
You can compare performance, juggle your budget, and really dig deep into the relative ROI of each campaign.
Plus, if you’re already using digital marketing tools like Mailchimp, Hubspot, or Salesforce, you can integrate those, too, so you have all your sales data in one place.
For more information on leveraging Facebook’s advertising capabilities, check out this guide on Facebook ad tools.

How do you set up Facebook ads using Hootsuite?
If you’d rather manage paid and organic campaigns across Facebook, Instagram, X (formerly Twitter), and LinkedIn in one place, an all-in-one solution like Hootsuite is your best bet. Managing everything together gives you a single view of performance and makes proving ROI far easier.
Here’s how to use Hootsuite Social Advertising to create and manage your Facebook ads.
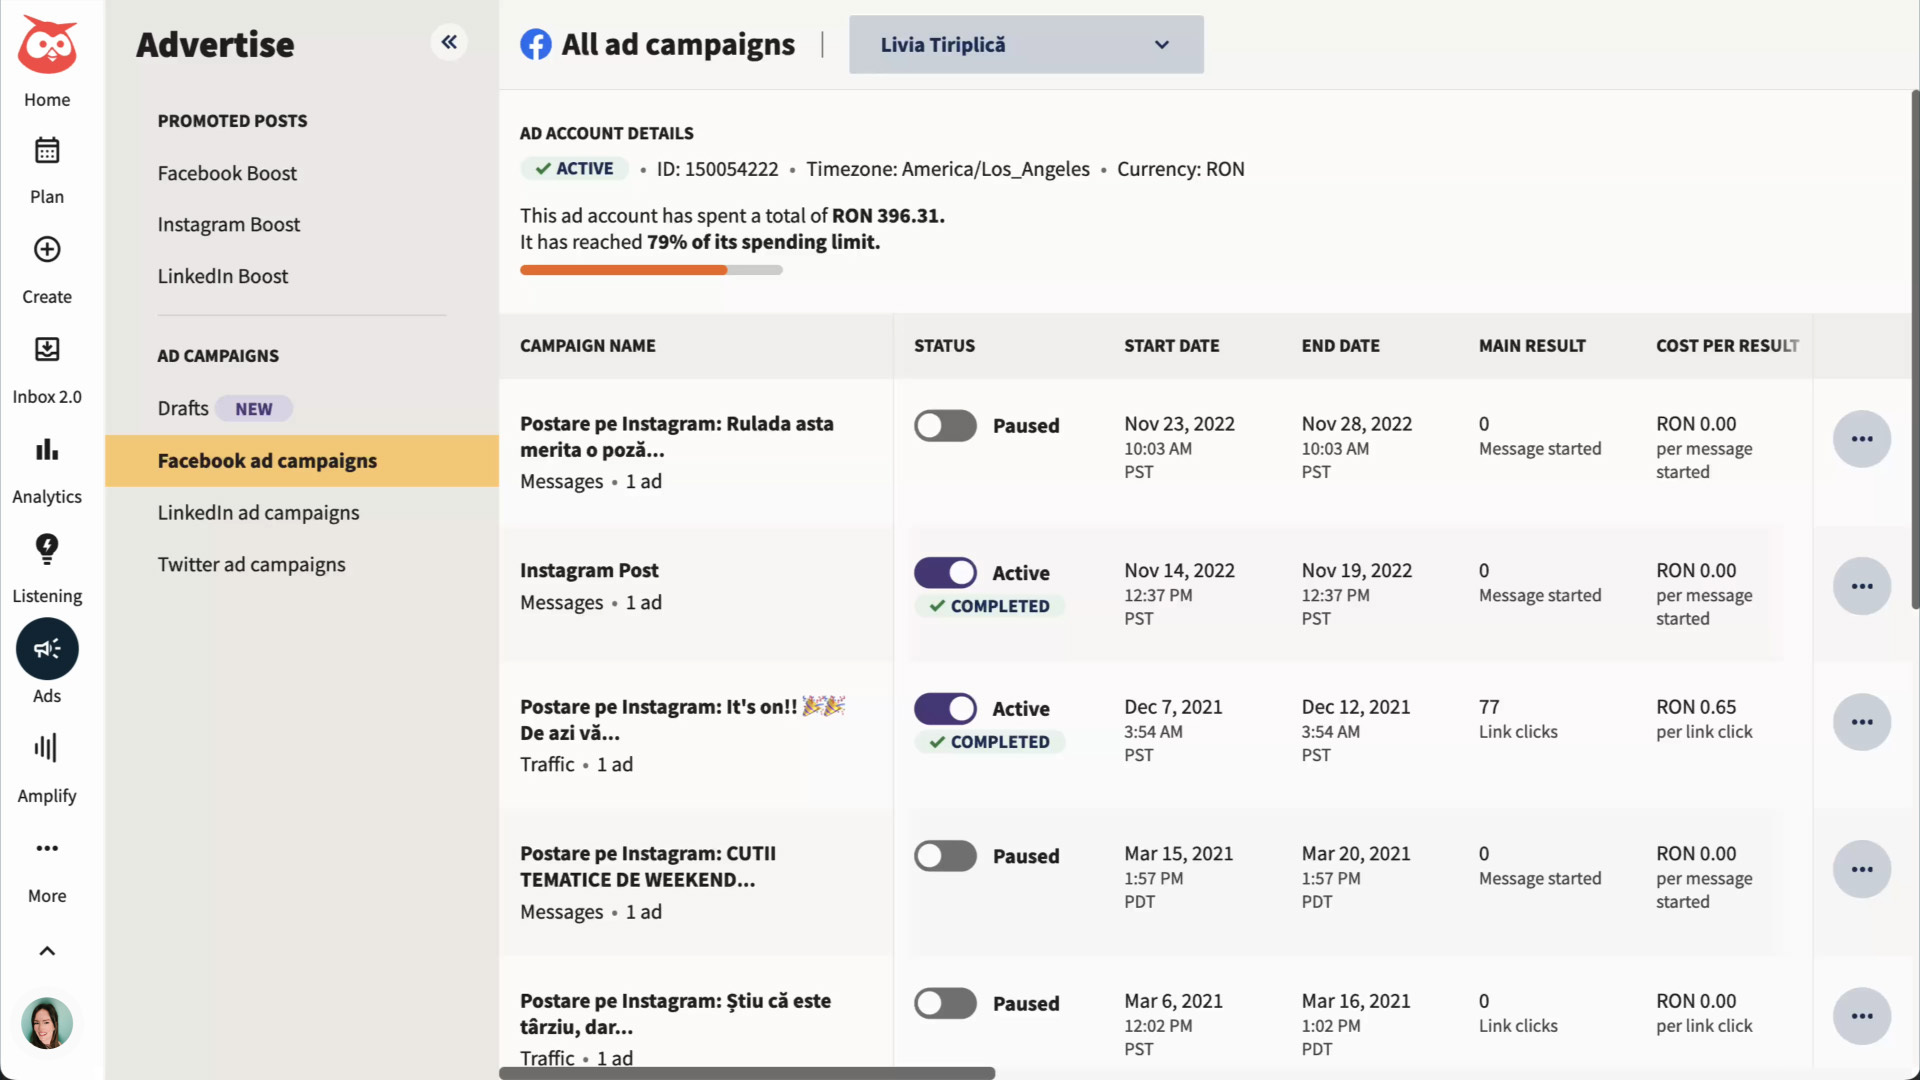
Step 1: Set up your Facebook campaign
In the left-hand navigation of your Hootsuite dashboard, select Advertise and then Facebook Boost.

Select Set up an automated boost, choose your Facebook Page and ad account, then enter a name for your campaign.
Step 2: Choose your campaign objective and settings
Choose an ad campaign objective from the following:
- Traffic: Drive traffic to a website or landing page.
- Engagement: Get people to interact with your ad. Your conversion can either happen on your ad or website.
- Awareness: Get more people to remember your brand.
- Leads: Track leads conversions for your website.
- Sales: Track sales conversions for your website.
Just like in Meta Ads Manager, next you’ll note if there are any Special Ad Categories your campaign falls into, and fill out the rest of the Campaign details.
Step 3: Choose your target audience and set your budget
Hootsuite allows you to either build your own ad audience or import saved or custom audiences from Facebook.
If you choose to build your own audience, you can refine by demographics, interests, or behaviors.

If you’ve already built custom or lookalike audiences in Facebook, no problem — you can target those audiences using Hootsuite too.
Meta will automatically choose ad placements for you based on your chosen objectives, but you can override this default if you’d rather choose your own placements.
Next, set your budget and the length of your campaign. You can set a daily or total budget for your ad campaign. Meta allocates your ad spend until the campaign ends or the budget runs out.
Step 4: Create your Facebook ad
The creative elements you need for your ad will depend on your campaign objective — Traffic campaigns, for example, will require a website URL.
Keep the following restrictions in mind when adding an image or video to your ad:
- Facebook images must be larger than 262px by 262px.
- Instagram images must have an aspect ratio between 0.565 and 7.8, and be at least 500 px by 500 px.
- Instagram videos must have an aspect ratio between 4:5 and 16:9, and must be larger than 500px by 262px; length must be 120 seconds or shorter.
As you build your ad, Hootsuite displays a preview of what your ad will look like on mobile, desktop, and Instagram.
Step 5: Publish your Facebook ad campaign
Once you’ve built your ads and checked the ad preview for all platforms to make sure you’re happy with how they look, you’re ready to publish your ad campaign.
Select Summary to review your campaign details. You can return to previous screens to make any changes you need to. If you’re happy with your campaign, select Publish campaign. You’re done!
Hootsuite sends the campaign to Facebook for approval. Facebook typically approves the campaign within 24 hours.
To recap, here’s what you can do using Hootsuite Social Advertising:
- Create ad campaigns on Facebook, Instagram, X (Twitter), and LinkedIn
- Manage the spend and targeting of your ad campaigns
- Create advanced and lookalike audiences
- View paid and organic posts side by side in the Planner
- Review the performance of paid and organic posts in Hootsuite Analytics
Hootsuite Social Advertising is available to Enterprise plan users, so upgrade your plan to get started.

Build and post ads for Facebook, Instagram, LinkedIn, and X. Our targeting and reporting are seriously easy.
Start your free trialHow do you target the right audience with Facebook ads?
You can target the right audience on Facebook by combining core targeting, custom audiences, lookalike audiences, and Meta’s Advantage+ audience. Each approach reaches people in a different way, and the strongest campaigns often layer them together.
Here’s how the main Facebook ad targeting options compare:
Audience type | Description | Best for | Data required |
|---|---|---|---|
Core | Targets people by demographics, interests, and behaviors | Reaching new audiences by profile | None (built in Ads Manager) |
Custom | Targets people who already know you | Retargeting and re-engagement | Website visitors, email lists, or app users |
Lookalike | Finds new people who resemble an existing audience | Scaling to similar high-value users | A source custom audience |
Advantage+ | Uses Meta’s AI to find your best audience automatically | Efficiency and scale with less setup | A starting audience signal |
For enterprise teams, these options scale across regions and brands. You can build custom audiences from CRM data for each market, then create lookalike audiences to expand into new ones. Strong targeting also pairs well with strong creative, so keep an eye on how your audiences respond and refine over time. For more on keeping audiences active, see our tips on boosting engagement.
What are the best Facebook advertising tips for better results?
These eight Facebook ad best practices will help you get more from every dollar you spend.

1. Design for mobile first
Most people check social media on their phones, so focusing on mobile-friendly ads is a surefire way to better reach your audience.
Be sure to:
- Film videos vertically (9×16).
- Keep text minimal and use large fonts.
- Add animations for engagement.
- Keep videos short (15 seconds or less).
2. Capture attention in the first 3 seconds
Keep it quick and snappy. Start your ad with the main message and branding in the first 3 seconds.
3. Make sound optional
Lots of folks watch video with the sound off, whether it’s because they’re hard of hearing or watching your ad on the bus.
Be sure to:
- Use visuals to convey your message.
- Add captions for voiceovers.
- Include text for key messages.
4. Use the pitch, play, plunge method
Facebook’s pitch, play, plunge method could work for you. Combine different creative types:
- Pitch: Make people aware of your brand, product, or service.
- Play: Create entertaining interactive content for the curious.
- Plunge: Try some immersive experiences for deeper engagement.
5. Test creative variations with A/B testing
Run A/B testing to learn what resonates before you scale spend. Test one variable at a time, like the headline, image, or call to action, so you know exactly what drove the difference. Let each test gather enough data before you call a winner, then put your budget behind the version that performs best.
6. Leverage Advantage+ AI features
Lean on Meta’s Advantage+ AI features to automate targeting, placements, and creative optimization. These tools test combinations faster than any manual process and shift budget toward what’s working in real time. For lean teams managing many campaigns, that automation frees up time for strategy and creative.
7. Implement retargeting for higher conversions
Use retargeting to reconnect with people who already engaged with your brand. Build custom audiences from website visitors, video viewers, or past customers, then serve them ads tailored to where they left off. Retargeting audiences typically convert at higher rates because they already know you, which lowers your cost per acquisition.
8. Base ad decisions on analytics
Use Facebook’s built-in tools to track impressions, clicks, click-through rates, engagement, and ROI. For deeper insight, look beyond vanity metrics like likes and focus on return on ad spend, cost per acquisition, and conversion rate. Third-party tools like Hootsuite help you see where to adjust your campaign and where to double down, so future campaigns improve based on real data.
How do you troubleshoot common Facebook ad problems?
When Facebook ads underperform, the cause usually falls into one of a few common categories. Here are the most frequent problems and how to fix them:
- Ad not approved: Your ad likely violated Meta’s advertising policies. Review the policy details, edit the flagged element (such as restricted content or misleading claims), and resubmit.
- Low reach or high costs: Your audience may be too narrow or your creative may have a low relevance score. Broaden your targeting, refresh your creative, and consider testing the Advantage+ audience.
- Poor click-through rates: Your copy or visual may not match your audience’s intent. Test a stronger benefit-led headline and a clearer call to action.
- Tracking or pixel issues: Conversions aren’t recording because the Meta Pixel or Conversions API isn’t set up correctly. Verify your pixel is firing on the right pages using Meta’s Events Manager.
- Account restrictions: Repeated policy violations can limit your account. Review Meta’s policies, resolve any flagged issues, and submit an appeal if needed.
Fixing these issues early keeps your campaigns running smoothly and protects your budget.
What are some Facebook ad examples to inspire your next campaign?
Ready to get inspired? Here are three Facebook ad examples you can learn from. If you want more, try this roundup of the best Facebook ad examples.
Reddit for Business
Reddit’s image ad is a prime example of using text to your advantage.
The ad clearly and succinctly lists a benefit, “your best ROAS,” and an enticing offer, a $500 ad credit. The caption and CTA (call to action) are simple, “Ready to send ROAS soaring? Get Offer.”

Source: Reddit for Business on Facebook
Plus, Reddit’s tagged ‘r/LifeProTips’ at the top of the image as a nod to its platform.
Hootsuite
Hoostuite’s Facebook Story ad is a two-parter.
The first Story pulls in marketers with a product benefit, “Respond on social 2x as fast,” then follows up with the specific features that make the benefit happen.

Using two stories back-to-back helps grab users who are quickly tapping through the slides. This one-two advertising punch helps capture attention.
FAQ: Facebook advertising
How much does it cost to advertise on Facebook?
Is $5 a day enough for Facebook ads?
Is $10 a day good for Facebook ads?
How do I start advertising on Facebook?
What is the best Facebook ad format for beginners?
How do I target the right audience on Facebook?
What is Advantage+ in Facebook ads?
How do I measure Facebook ad ROI?
Why was my Facebook ad rejected?
Can I run Facebook ads and Instagram ads at the same time?
Save time managing your social media marketing strategy with Hootsuite. Publish and schedule posts, find relevant conversions, measure results, and more — all from one dashboard. Try it free today.
With files from Holly Stanley.