The YouTube algorithm is a system that recommends videos to users based on their interests, viewing history, and engagement patterns.
YouTube pulls videos that each viewer is most likely to watch and enjoy, using factors like watch time, click-through rate (CTR), satisfaction surveys, and viewing habits across different devices and times of day. The algorithm’s goal is to show users the most relevant and valuable content in order to keep them engaged and on the platform.
YouTube’s recommendation algorithm drives 70% of what people watch on the platform, so it’s no surprise that marketers, influencers, and creators are obsessed with unlocking its secrets.
In this blog post, we’ll cover everything you’ve been dying to know about the YouTube algorithm: how it works, key ranking factors, and ways to optimize for more views.
Bonus: Download the free 30-day plan to grow your YouTube following fast, a daily workbook of challenges that will help you kickstart your Youtube channel growth and track your success. Get real results after one month.
How the YouTube algorithm works in 2025
YouTube’s recommendation system delivers personalized video suggestions based on each user’s viewing habits, engagement patterns, and content preferences.
Instead of pushing videos to users, the algorithm pulls content that each person is most likely to enjoy. Every time a user logs in, YouTube ranks and adapts recommendations based on real-time behavior rather than just surfacing popular content.
When deciding what to recommend to each user, the YouTube algorithm takes into account the following:
- What videos have they enjoyed in the past? If you watched a 40-minute video essay about the flags of the world and engaged with it (e.g., liked or commented), expect more of the same coming your way.
- What topics or channels have they watched previously? If you subscribe to the Food Network’s YouTube channel, the algorithm will likely show you more cooking content.
- What videos are typically watched together? If you watch “How to change a monster truck tire,” and most people who watch that also watch “Monster truck repair 101,” YouTube might recommend that as follow-up viewing.
- When and how are they watching these videos? The algorithm adapts recommendations based on the time of day and device type. If a user watches news on their phone in the morning but prefers long-form documentaries at night on their smart TV, YouTube will prioritize different content for each session.
So how does YouTube evaluate if a video is worthy of recommendation?
It’s not about the content. YouTube’s algorithm doesn’t evaluate the content itself — it measures how viewers interact with it.
“Our algorithm doesn’t pay attention to videos; it pays attention to viewers. So, rather than trying to make videos that’ll make an algorithm happy, focus on making videos that make your viewers happy,” says YouTube.
How the YouTube algorithm ranks videos
The YouTube recommendation system ranks content based on a mix of engagement, user behavior, and long-term relevance.
These factors work together to determine which videos show up in search results, home feeds, and suggested videos.
1. Viewer engagement signals
These traditional ranking factors help YouTube assess whether a video is worth recommending:
- Click-through rate (CTR): How often users click on your video when they see it in search results or recommendations.
- Watch time & retention: The total minutes watched and the average percentage of the video viewed.
- Likes, comments, and shares: These indicate strong audience interest and engagement.
- Negative feedback: If users frequently click “Not Interested” or dislike your video, YouTube may suppress recommendations.
How to boost viewer engagement signals: Improve thumbnails and titles to boost CTR, and focus on delivering value quickly to improve retention.
2. Viewer satisfaction
YouTube prioritizes videos that provide a positive viewing experience, not just those that hold attention the longest.
- Satisfaction surveys: YouTube collects millions of responses to understand if viewers liked what they watched.
- Post-watch behavior: Does the viewer continue watching more content, or do they leave YouTube entirely?
- Replays & return viewers: A video that people rewatch or revisit later signals high satisfaction.
How to improve viewer satisfaction: Make every second count. Prioritize your hook, avoid unnecessary intros and get straight to the value.
3. Personalized recommendations (user behavior and context)
Because YouTube customizes content for every individual, it factors in:
- Watch history: The platform suggests videos based on previous interests.
- Viewing habits: If a user watches short-form news in the morning but long-form content at night, YouTube adapts recommendations accordingly.
- Device & time of day: YouTube prioritizes different content types on mobile vs. TV.
How to keep people coming back: Create bingeable content. Use playlists and end screens to encourage viewers to stay engaged with your channel.
4. Long-term relevance (evergreen vs. trending content)
YouTube’s algorithm resurfaces older content when it becomes relevant again.
- Search trends: If a news event or viral trend makes a topic popular, YouTube may boost related older videos.
- Nostalgia & cultural moments: Some videos gain traction again due to recurring trends or past events.
- Content refresh cycles: Topics like fitness in January or holiday recipes in December see seasonal engagement spikes.
How to improve long-term performance: Optimize older videos by updating thumbnails, descriptions, and pinned comments to align with new trends.
5. Multi-language and global audience optimization
Videos with multi-language support have a better chance of reaching a global audience.
- Dubbed or translated content: YouTube tracks video performance separately for each language, meaning dubbing your content can increase international reach.
- Localized metadata: Translating titles and descriptions can help your video rank in multiple regions.
- Content availability in multiple languages: Channels that dub at least 80% of their catalog tend to perform better globally.
How to reach new markets: If you want to expand globally, prioritize dubbing your best-performing content first instead of translating random videos.
Where YouTube recommends videos
The ranking factors above are combined in slightly different ways, depending on where on YouTube you are receiving recommendations.
YouTube recommends videos in three different places on the platform.
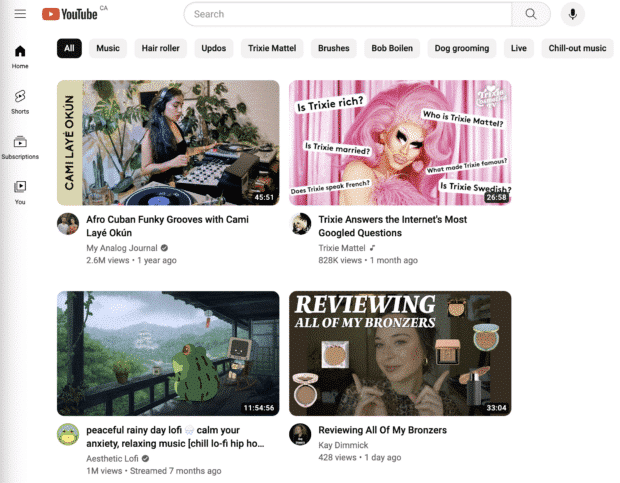
Home
When a user opens YouTube, they see a personalized home feed. This is curated based on:
- Performance of the video (CTR, watch time, and engagement)
- Watch and search history of the user
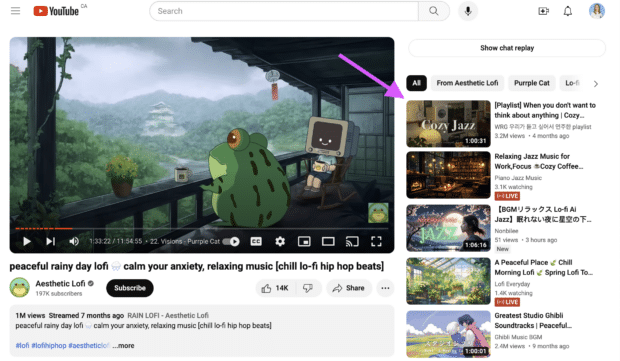
Suggested videos
These appear alongside videos a user is already watching. YouTube recommends them based on:
- The topic of the current video
- The viewer’s watch history
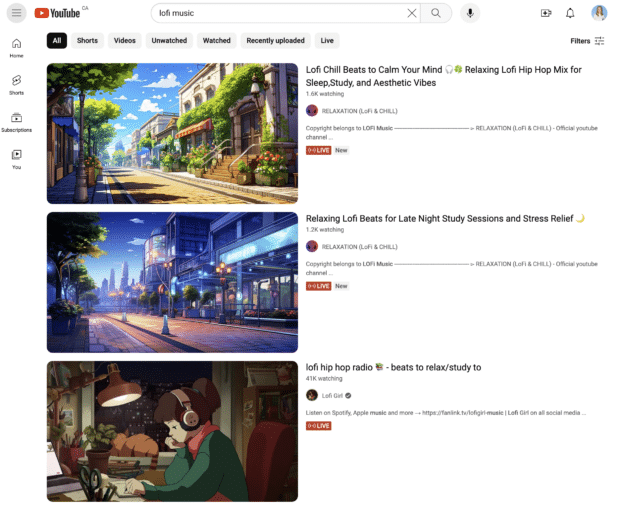
Search results
Each user’s search results will be slightly different thanks to the personalized signals the algorithm takes into account. These signals include:
- The relevance of the title, description, and video content to the search term
- Performance metrics like engagement and watch time
What is the YouTube Shorts algorithm?
YouTube Shorts is one of the fastest-growing content formats, with nearly 70 billion daily views. Unlike traditional YouTube videos, Shorts are designed for swipe-based discovery—meaning users don’t select specific videos but instead scroll through a feed of recommended content.
This key difference means the YouTube Shorts algorithm works differently from the regular recommendation system. Instead of ranking videos based on traditional search intent, Shorts are served dynamically based on user engagement, watch history, and content trends.
How the YouTube Shorts algorithm works
YouTube doesn’t rank Shorts based on how recent they are. Instead, the algorithm tests new Shorts with small audiences first. If a video performs well, it gets recommended to wider audiences over time. This means Shorts can go viral weeks or even months after posting.
According to YouTube, timing and the quantity of Shorts you upload aren’t crucial factors for optimization. It’s more about putting out quality content.
Unlike some platforms where just looking at the first frame counts as a view, Shorts requires viewers to actually want to watch, although they won’t say exactly how much. View duration matters much more than total watch time.
For example:
- A 30-second Short with 85% watch duration will likely rank higher than a 60-second Short with only 50% retention.
- Looping Shorts (where viewers rewatch part of the video) tend to get more recommendations than those with lower replay rates.
How the YouTube Shorts algorithm ranks videos
Here’s a quick breakdown of what the YouTube Shorts algorithm takes into account:
- Engagement: Do viewers like, comment, and share the video?
- Watch duration: How much of the Short does the average user watch? (The closer to 100%, the better.)
- Replays and loops: If the Short naturally loops or gets rewatched, it signals strong interest.
- Content variety: YouTube avoids showing too many Shorts from the same creator back-to-back.
- User preferences: YouTube tailors Shorts feeds based on what users have liked, watched, or skipped in the past.
Unlike long-form videos, click-through rate (CTR) isn’t a ranking factor, since users don’t actively click Shorts — they swipe through them.
Shorts and YouTube monetization
In 2023, YouTube revamped its Shorts monetization model, allowing creators to earn ad revenue through the YouTube Partner Program. This means:
- Watch time from Shorts does not count toward long-form monetization but can qualify you for Shorts Ad Revenue Sharing.
- Subscribers gained from Shorts count toward monetization eligibility.
- Shorts that drive long-form views help channels grow overall.
Use Shorts to funnel viewers to longer videos. Add pinned comments and call-to-actions leading to your main content or YouTube playlists.
5 tips for optimizing your YouTube Shorts
Ready to take Shorts by storm? Keep these top tips in mind when planning your Shorts strategy:
- Hook your audience in the first 2 seconds. Since Shorts autoplay, the first frame must instantly grab attention. Avoid slow intros.
- Make it loop seamlessly. YouTube favors Shorts that naturally loop or encourage rewatching.
- Use trending audio & effects. Like TikTok, using popular sounds, effects, and memes can help boost discovery.
- Encourage comments & shares. Ask a question or spark discussion—Shorts with more engagement get pushed to more viewers.
- Give your Shorts time to grow. Shorts don’t always go viral immediately. Keep posting consistently, and YouTube will continue testing your content with new audiences.
16 tips to improve your organic reach on YouTube
While there are no YouTube algorithm instructions, remember that the algorithm follows the audience. If you already have a YouTube marketing plan in place, these 16 data-backed strategies will increase your video’s chances of getting recommended.
We’ve grouped these tips into four key areas to help you prioritize your strategy:
- Visibility and discoverability (Getting found in search and recommendations)
- Engagement and community building (Encouraging interaction and shares)
- Watch time and retention (Keeping viewers watching longer)
- Optimization and analytics (Using data to refine your approach)
Visibility and discoverability: How to get found on YouTube
1. Do your keyword research
YouTube is a search engine as much as a video platform, so you want to use accurate, concise language that people are already using when they search.
For example, if you were uploading a comedy sketch, you should probably include the words “comedy” and “funny” in the title and description and be crystal clear about the topics or subject of the video.
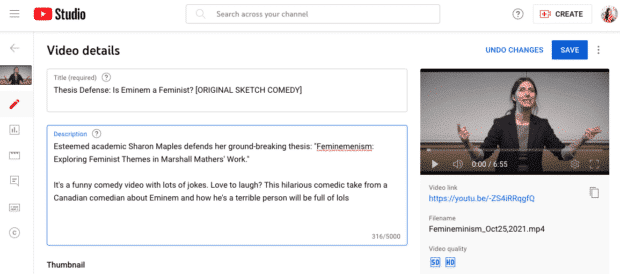
Once you’ve identified your primary keywords, you’ll want to use them in four places:
- In the file name (i.e., comedy-dad-jokes.mov)
- In the title (using catchy natural language like “Real life dad does stand up comedy for first time”)
- In the YouTube video description (especially within the first two lines, above the fold)
- In your subtitles and captions (upload an SRT file to improve discoverability).
But don’t:
- Use keywords in the video’s tags. According to YouTube, tags “play a minimal role in video discovery” and are most helpful if your keyword or channel name is often misspelled. (i.e., standup, stand up, comedy, comedie, etc.)
- Don’t overdo it on the keywords, either. YouTube’s algorithm prioritizes natural language, and keyword stuffing is against YouTube’s policies on spam, deceptive practices, and scams.
Hot tip: Free tools like Google Keyword Planner and YouTube search suggestions can help you identify relevant keywords..
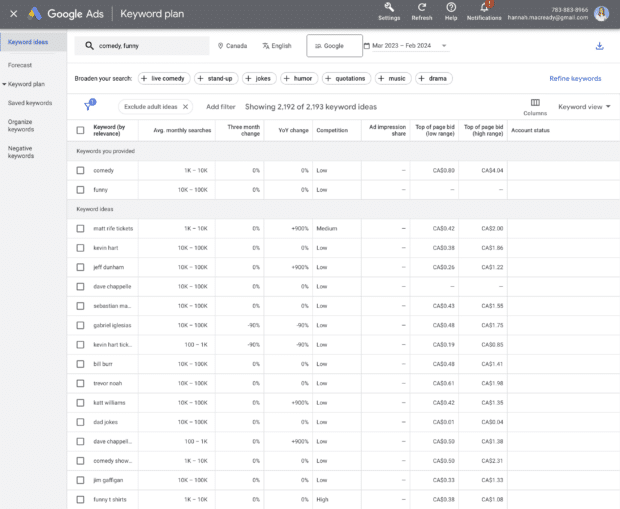
Read more about social SEO and YouTube SEO to keep your knowledge brewing.
2. Write clickable titles (that aren’t clickbaity)
Your title is your first impression. YouTube’s algorithm tracks CTR (click-through rate), so an irresistible title can boost visibility.
- Use curiosity-driven phrases: (“This Trick Tripled My YouTube Views!”)
- Add a number or list format (“5 Editing Mistakes That Kill Your Video”)
- Keep it under 60 characters to avoid getting cut off in search results
Just remember: avoid misleading titles. If people click but bounce quickly, the algorithm will suppress your video.
3. Design engaging thumbnails
Your thumbnail and title work together to drive clicks.
YouTuber Joshua Weissman uses a consistent style for his thumbnails that usually feature his face, a succinct title, and intriguing imagery.
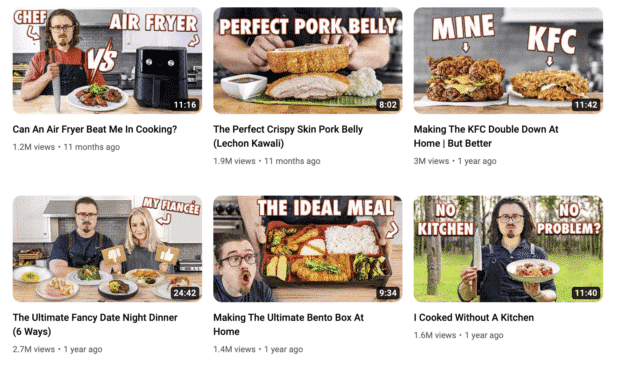
To maximize your video’s appeal:
- Upload a custom thumbnail (and keep the visual style consistent across all your thumbnails)
- Use high-contrast colors and bold text
- Show emotions or action shots to create intrigue
A free tool like Canva can be a great way to create visually appealing thumbnails.
4. Hop on trending topics
YouTube boosts fresh content related to current events, trends, and viral topics.
- Use Google Trends or YouTube’s “Trending” tab to spot what’s hot
- Jump on seasonal or recurring topics (e.g., “Best Gifts for Creators 2025” in December)
Only create trend-based videos if they align with your niche and established brand voice. Not every brand can be Duolingo, and that’s okay!
5. Attract views from other sources
Views that don’t come from the YouTube algorithm can still inform your success with the algorithm.
For example, you can attract views from YouTube ads, external sites, cross-promoting on social media, and partnerships with other channels or brands can all help you earn views and subscribers, depending on your strategy.
For instance, on the Murphy Beds Canada website, the support section links to a selection of videos that open in YouTube.
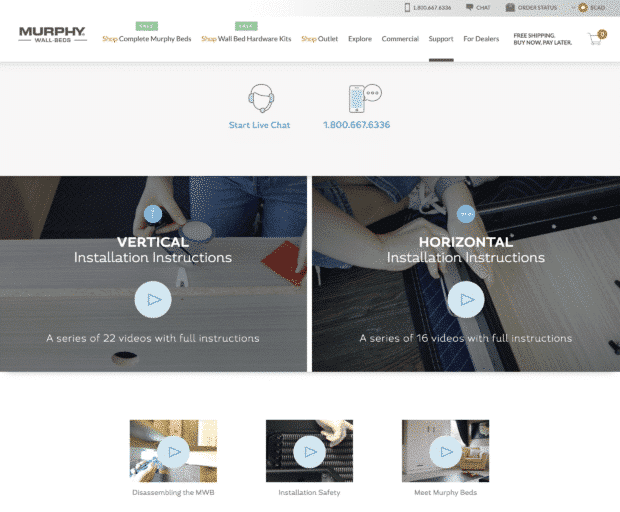
The algorithm won’t punish your video for having a lot of traffic from off-site (e.g., a blog post). This is important because click-through-rates and view duration often tank when the bulk of a video’s traffic is from ads or an external site.
According to YouTube’s product team, the algorithm only pays attention to how a video performs in context. So, a video that performs well on the homepage will be surfaced to more people on the homepage, no matter what its metrics from blog views look like.
Pro tip: Embedding a YouTube video in your blog or website is great for both your blog’s Google SEO as well as your video’s view counts on YouTube.
Engagement and community building: How to increase interaction
6. Encourage comments, shares and saves
In order for your audience to grow, you need to nurture your relationships with your viewers. For many viewers, part of YouTube’s appeal is feeling closer to creators than they do to traditional celebrities.
Use Hootsuite Listening to monitor untagged mentions and stay up to date about every conversation that affects your industry.
For engagement that’s a little closer to home, keep an eye on these engagement signals that tell YouTube that your video is worth recommending.
- Ask direct questions in your videos (e.g., “Which strategy worked best for you? Let me know in the comments!”)
- Use polls & pinned comments to start conversations
- End with a clear CTA (e.g., “If this helped, hit that share button!”)
7. Respond to comments and engage with your audience
YouTube rewards creators who interact with their audience.
- Reply to early comments—this can boost ranking in the first few hours
- Use the heart button to highlight great responses
- Pin your most valuable comment to keep discussions going
Getting overwhelmed by irrelevant comments? Use YouTube’s “held for review” tab to filter out spam comments.
8. Post at the best time for your audience
The YouTube algorithm doesn’t directly base its recommendations on what time or day you post. But the algorithm does take stock of a video’s popularity and engagement. And one surefire way to get more views on YouTube is to post your video when your audience is online.
Prep your videos in advance and then use a scheduling tool for maximum reach. The Hootsuite scheduler, for instance, provides custom recommendations for the best posting time for your audience. Here’s how it works:
9. Make your videos accessible to everyone
Social media is used by a diverse and global audience. Your viewers likely come from different countries, backgrounds, and abilities — and you want your content to be easy to access no matter who they are.
Social media accessibility is the process of designing social media content to be inclusive to everyone, including those with disabilities.
On YouTube, this might look like including closed captioning in your videos, adding alt text to your YouTube thumbnails, or using descriptive captions that are easily read by screen readers.
Ignoring social media accessibility will close your content off to a wide range of viewers, which will lead to lower views, less engagement, and overall less boost from the YouTube algorithm.
Watch time and retention: How to keep viewers watching
10. Hook your audience within the first 5 seconds
If you lose viewers early, YouTube won’t recommend your video.
- Cut slow intros — jump straight into the action
- Use a teaser to build anticipation (“By the end of this video, you’ll know how to…”)
- Add fast cuts, graphics, or on-screen text to keep visual interest
Then, once you have a viewer watching one video, make it easy for them to keep watching your content and stay within your channel’s ecosystem.
11. Use chapters and timestamps
Longer videos perform better if they are well-structured. Make it easy for your viewers to jump to their favorite sections or replay critical information.
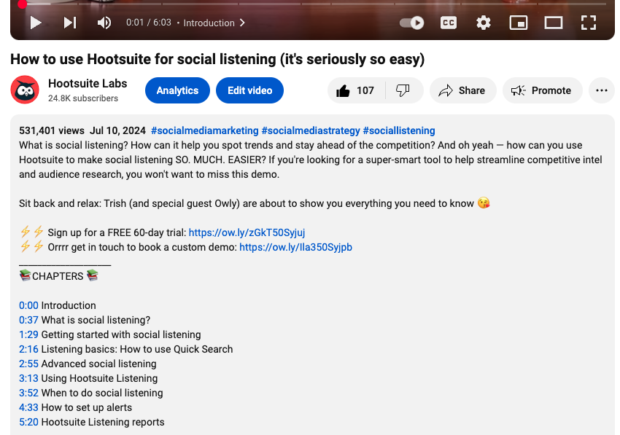
Add timestamps in the description (e.g., “0:00 Intro | 1:30 Step 1 | 3:45 Final Tips”), like in the example above. And remember, chapters improve CTR since they allow viewers to preview sections before clicking.
12. Create binge-worthy playlists
Playlists increase session watch time, which is one of the top algorithm signals.
Take advantage of this tip by grouping videos into thematic playlists (“LinkedIn Strategy 2024”), like in the example below.
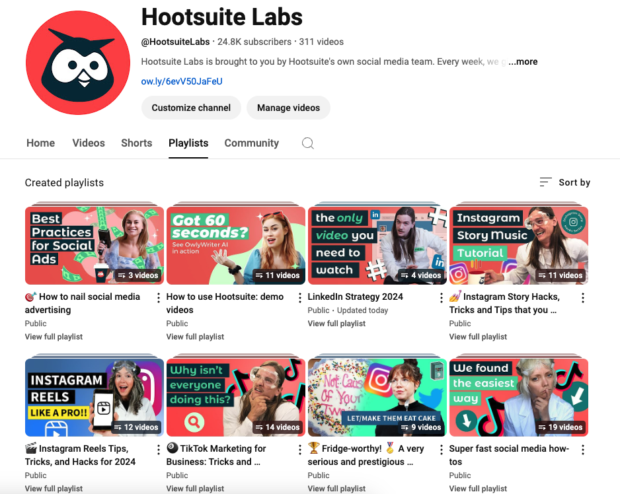
You can also enable “Autoplay Next Video” to keep viewers engaged.
13. Use YouTube end screens and cards
These handy interstitials increase retention by guiding viewers to more content.
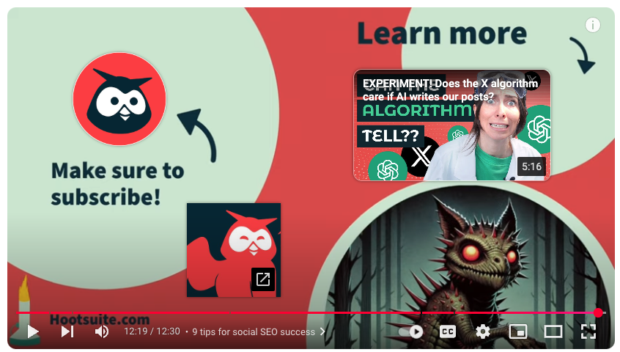
Take advantage of this opportunity to keep your viewers engaged! Try adding 2-3 end screen elements (next video, subscribe button, playlist) to each video.
You can also use cards to recommend related videos throughout your content
For more on converting viewers to subscribers, read our guide to getting more YouTube subscribers.
Pro Tip: Making a video series is a great way to capitalize on a recent spike in viewers. Using a scheduling tool like Hootsuite can make it easy to pre-plan your monthly factory tour or interview sessions in advance.
Optimization and analytics: How to improve performance
14. Analyze, analyze, analyze
As with everything on social media, data is your best friend. If your strategy is stuck, stunted, or stalled, it’s probably time to take a look at your analytics.
Without detailed analytics and data tracking, you’re only speculating. Tools like Hootsuite collect intricate data points about your YouTube analytics performance and make them easy to view and understand in a simple dashboard.
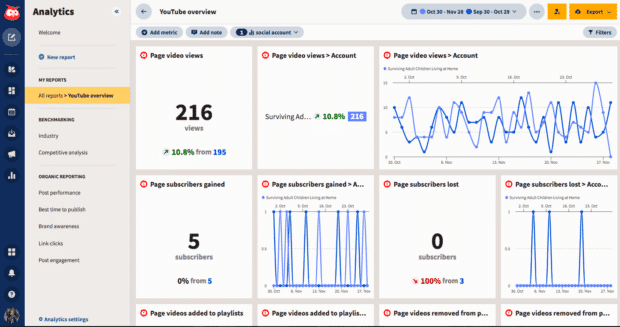
Get clear charts, graphs, and numbers that you can then turn into reports to share with your wider team. Then, use the information gathered to better inform your YouTube videos going forward.
Get to know your YouTube audience by digging into your analytics, either via YouTube directly or using Hootsuite’s audience insights tool.
Understanding their location, their gender, and their age can help inform your content strategy. Watching how they actually interact with your videos—engagement, watch time, and all of those important social media metrics—also will point you in the right direction.
15. Test video lengths, thumbnails, and titles
When it comes to experimentation, YouTube gives you plenty of tools to work with.
YouTube doesn’t favor long or short videos—it favors engagement.
So think less about total length when you’re creating a video and more about creating compelling content that keeps the viewer watching through to the end, no matter how long or short your video is.
If they’re dropping off 25% of the way through, that’s not great, whether your video is 6 minutes or 60 minutes.
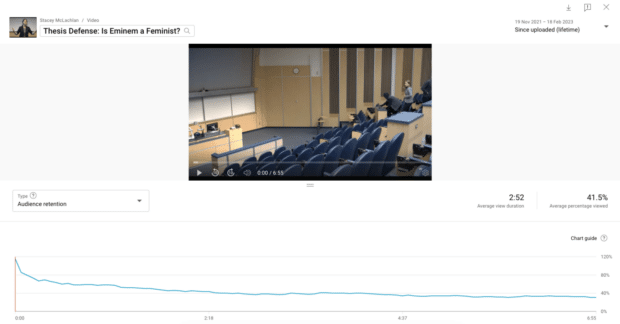
Pro tip: Check out your audience retention metric to help understand how long your unique viewers like to watch. Then you can adjust your content accordingly.
YouTube also makes it easy to update thumbnails and titles. Change thumbnails and track CTR improvements, then experiment until you find the winner.
Try testing different title styles (e.g., question-based vs. list-based) to see what resonates.
16. Keep an eye on your best competitors
Sometimes, the best way to get inspiration is by checking out what your competitors are doing right… and wrong.
Does your primary competitor create similar content but get way more views? Maybe this is a sign to analyze their thumbnails, video descriptions, or dive deeper into their cross-promotion strategy.
Similarly, if you notice your videos consistently outperform the competition, take note of what you’ve done differently lately and what they are failing to do.
The more you know, the more you grow.
Bonus! A brief history of the YouTube algorithm
Like any social platform, YouTube is constantly evolving, and so are its algorithms. Let’s do a quick overview of how YouTube’s algorithm has changed over the years and how it works today.
2005-2011: Optimizing for clicks and views
YouTube’s algorithm started off by recommending videos that attracted the most views or clicks.
According to founder Jawed Karim (a.k.a. the star of Me at the Zoo), YouTube was created in 2005 in order to crowdsource the video of Janet Jackson and Justin Timberlake’s notorious Super Bowl performance.
This focus led to an increase in misleading titles and thumbnails, also known as clickbait. When videos left people feeling tricked, unsatisfied, or plain old annoyed, user experience took a nosedive.
2012: Optimizing for watch time
In 2012, YouTube adjusted its recommendation system to support time spent watching each video. It also included time spent on the platform overall. The theory is simple: when people find videos valuable and interesting, they watch them for longer.
This shift to reward watch time was a game changer. According to Mark Bergan, author of Like, Comment, Subscribe: Inside YouTube’s Chaotic Rise to World Domination, “[Watch time] had an immediate impact. Early YouTubers were basically making TikTok videos… but watch time created gaming, beauty vlogging, alt-right podcasts… all these verticals we now associate with YouTube.”
Accounts that were big performers previously (like videos from eHow, or MysteryGuitarMan) dropped off almost immediately.
YouTube’s algorithm change led some creators to try to make their videos shorter to increase the likelihood of viewers watching them to completion. Others made their videos longer to increase watch time overall. YouTube didn’t comment on either of these tactics and maintained the party line: make videos your audience wants to watch, and the algorithm will reward you.
But as anyone who has ever wasted hours on the internet knows, not all time spent is quality time. Soon, YouTube changed tack again.
2015-2016: Optimizing for satisfaction
In 2015, YouTube began measuring viewer satisfaction directly with user surveys. It also prioritized direct response metrics like Shares, Likes, and Dislikes (and, of course, the especially brutal “not interested” button).
In 2016, YouTube released a whitepaper describing some of the inner workings of its AI: Deep Neural Networks for YouTube Recommendations.
In short, the algorithm had gotten way more personal. The goal was to find the video each particular viewer wants to watch, not just the video that lots of other people have perhaps watched in the past.
As a result, in 2018, YouTube’s Chief product officer mentioned on a panel that 70% of watch time on YouTube is spent watching videos the algorithm recommends.
2016-present: Dangerous content, demonetization, and brand safety
Over the years, YouTube’s size and popularity have resulted in an increasing number of content moderation issues. And what the algorithm recommends has become a concerning topic not just for creators and advertisers but for journalists and the government as well.
YouTube has said it is serious about its responsibility to support a diverse range of opinions while reducing the spread of harmful misinformation. Algorithm changes enacted in early 2019, for example, have reduced consumption of borderline content by 70%.
(YouTube defines borderline content as content that doesn’t quite violate community guidelines but is harmful or misleading. Violative content, on the other hand, is immediately removed.)
This issue affects creators, who fear accidentally violating ever-changing community guidelines. Or being punished with strikes, demonetization, or worse.
(Former CEO Susan Wojcicki said one of YouTube’s priorities in 2021 was increasing transparency for community guidelines for creators).
It also affects brands and advertisers, who don’t want their names and logos running alongside content the brand doesn’t agree with.
Meanwhile, American politicians are increasingly concerned with the societal role of social media algorithms. YouTube (and other platforms) have been summoned to account for their algorithms at Senate hearings. In early 2021, Democrats introduced a ”Protecting Americans from Dangerous Algorithms Act.”
In recent years, researchers have found that the new YouTube algorithm has made strides to reduce the amount of harmful content it serves. However, the 2024 Finnish election found evidence of YouTube promoting alt-right content — despite purported changes to the algorithm.
It seems we’re not out of the harmful-YouTube-content woods, just yet.
Let Hootsuite make growing your YouTube channel easier. Get scheduling, promotion, and marketing tools all in one place for your entire team. Sign up free today.

