Snapchat launched in 2011. And as of 2022, Snapchat is still one of the top 15 most-used social media platforms in the world.
While Facebook, YouTube, and Instagram may see more users than Snapchat each month, using Snapchat for business could still be an effective way for your brand to reach a new audience.
That’s because there are still 319 million users active on Snapchat each day. That’s millions of Snaps created, sent, and seen every day.

Not sure what Snapchat is? Think Snaps have something to do with gingery cookies? Back up. We’ve got a beginner’s guide that will provide you with the basics and walk you through the platform.
If you’re already comfortable using Snapchat, it’s time to take it to the next level. Here are essential Snapchat business tips and tricks you should know.
Benefits of Snapchat for business
First things first: Know that Snapchat might not be the right social media platform for every business.
However, if the following points speak to your brand’s values, it might be right for your brand to use Snapchat for marketing purposes.
Connect with a younger demographic
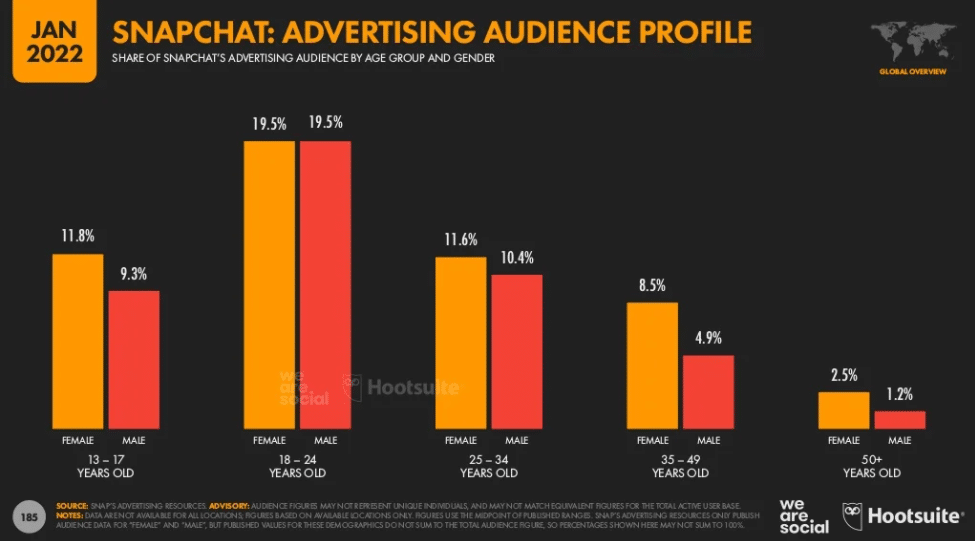
If your business wants to connect with people under the age of 35, Snapchat is the place to be.
Data from Snapchat reveals that the social platform reaches 75% of millennials and Gen Z and 23% of American adults, outpacing both Twitter and TikTok.
Source: Hootsuite Digital 2022 Report
Data also shows that Snapchat is an engaging platform for this younger audience. On average, users spend 30 minutes per day using Snapchat.
Get users to interact with your brand
While users are connecting with friends over Snapchat, they are also likely to discover new businesses. Snapchat’s current design connects friends via the ‘Chat’ button on the left-hand side of the home screen.
It connects users with brands and content creators via the Discover icon on the right hand of the home screen.
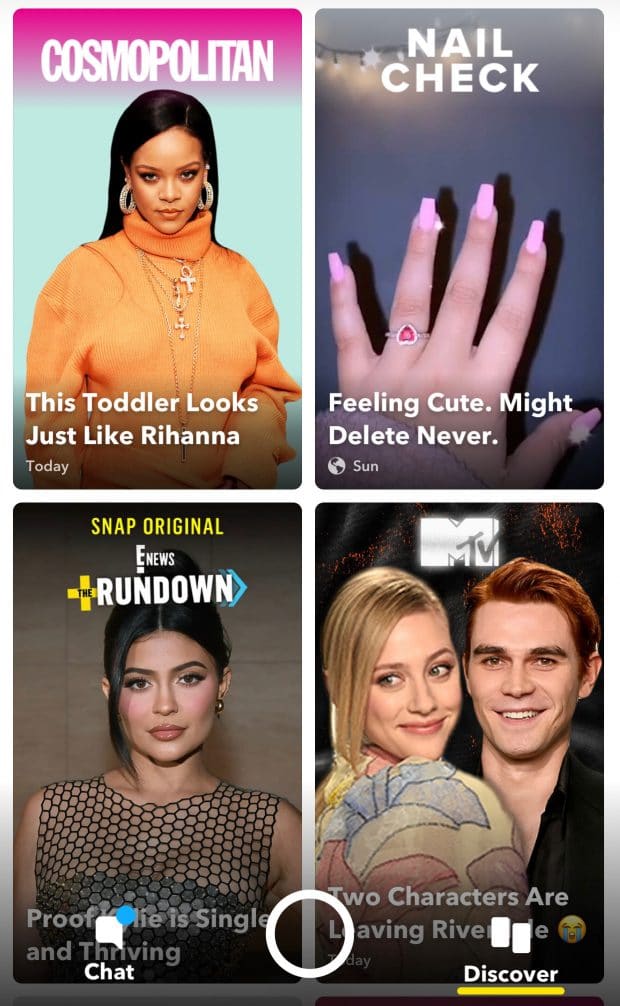
For example, in the Discover section Snapchatters can see content made by brands using Snapchat for marketing, like Cosmopolitan magazine and MTV. In 2021, 25 of Snapchat’s Discover Partners reached over 50 million unique Snapchatters from around the world.
Stand out and show your brand’s playful side
The Snapchat app was designed to be casual and fun. It’s about being authentic, not picture-perfect. Snapchat even calls itself the app for #RealFriends.
Many of the features you’ll use are about being lighthearted, creative, and even a little cheeky. For example, Snapchat recently launched new ways for users and brands to express themselves, like Converse Bitmoji’s and Snap Map Layers for Ticketmaster events.
(You can find more details on these new features in the marketing tips section below.)
How to set up a Snapchat for Business account
To effectively use Snapchat for marketing, you’ll need to create a Snapchat Business account. It doesn’t matter whether you’re using the platform for a large company or whether you’re using Snapchat for your small business — the Business account is needed.
Setting up a Snapchat Business account allows you to do more within the platform. It lets you access more features that will support your marketing strategy.
Your Business account will also let you create a Public Profile for Business, which gives your brand a permanent landing page on the Snapchat app (kind of like a Facebook page). Learn more about that in this video.
A few of the features you can access with a Snapchat Business account include:
- Advertising on Snapchat through its Ads Manager.
- Age-targeting your custom creations to reach your desired audience.
- Location-targeting your custom creations to reach an audience in a specific area.
Here’s a step-by-step breakdown of how to create a Snapchat Business account.
1. Download the app
Find the free Snapchat app in the App Store (for iOS devices) or in the Google Play Store (for Android devices).
2. Create an account
If your business isn’t on Snapchat yet, start by creating an account.
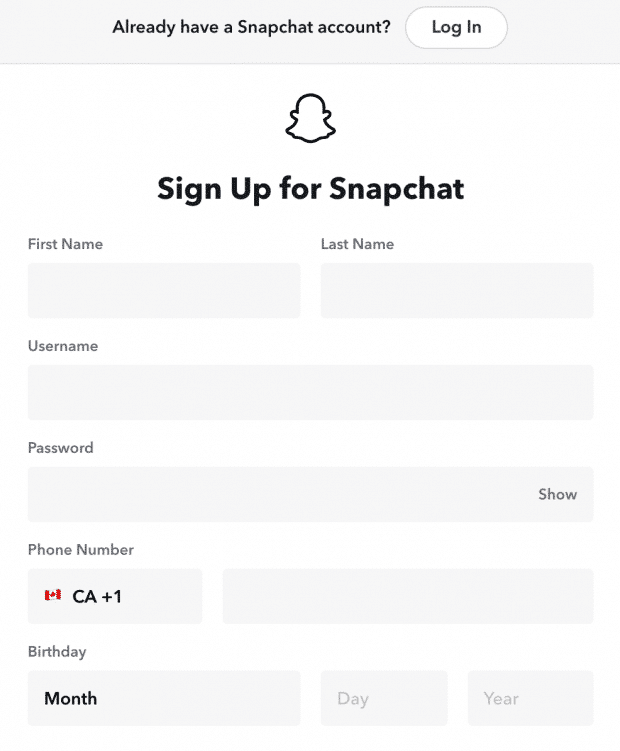
Enter all the relevant information, including the phone number and birthday, and select a username that reflects your brand.
3. Set up a Business Account
Once you have an account, set up your Snapchat Business account by accessing the Snapchat Business Manager. You’ll log in using the same username and password that you set up for your regular Snapchat account.
Then, you’ll be directed to a page that looks like this:
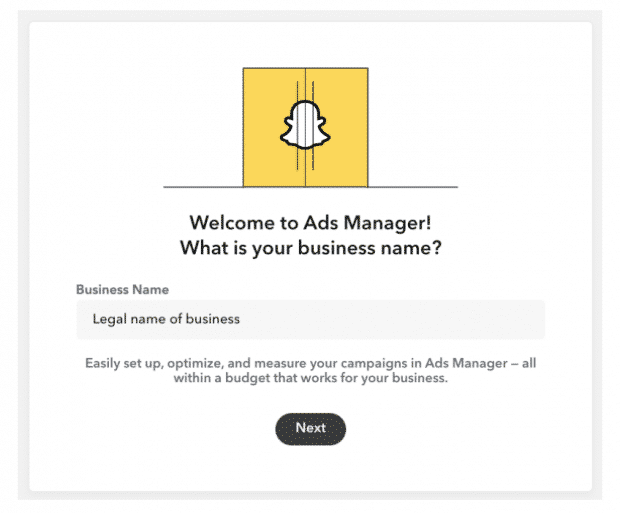
Enter your business’s legal name, your name, choose which country you’ll be doing business in and choose your currency. From there, a Business Account will be created automatically.
For even more details on how to create a Snapchat Business account, watch this video.
4. Start Snapping and creating campaigns!
Now that you’ve got a Snapchat Business Account, you’re ready to start advertising.
Creating Snapchat advertising campaigns can help you reach your target audience and start designing fun, quirky content that fits with your business’s tone.
What is Snapchat Business Manager?
Snapchat Business Manager is your one-stop shop for creating, launching, monitoring, and optimizing your Snapchat business account.
Much like Facebook Business Manager, Snapchat Business Manager offers built-in business management tools such as custom ad targeting, analytics, product catalogs, and more.
These features let you create engaging and exciting Snapchat business content within minutes. Plus, you’ll be able to track the performance of each Snap to ensure you’re reaching the right audiences.
Exciting features of Snapchat Business Manager:
- Instant Create: Create a single image or video ad in five minutes or less.
- Advanced Create: Built for in-depth campaigns. Narrow down your objectives, split test your ads, and create new ad sets within this simple tool.
- Events Manager: Connect your website to a Snap Pixel to track the cross-channel effectiveness of your ads. If a customer visits your website after seeing your ad, you’ll know about it.
- Catalogs: Upload product inventories directly to Snapchat to create a frictionless buying experience directly in the app.
- Lens Web Builder Tool: Create custom AR lenses to delight your audience. Use pre-set templates or build a custom lens from scratch.
- Create Filters: Use branded illustrations or images to connect your audience to your brand in their Snaps.
- Audience Insights: Learn more about your customers, what they like, and what they’re looking for with detailed audience data points.
- Creator Marketplace: Collaborate with top Snapchat creators for your next campaign.

How to use Snapchat for business
After mastering the basic, beginner-level skills, incorporate these tips for effective Snapchat marketing.
Let your audience know you’re on Snapchat
If Snapchat is a new addition for your business, the first step is to let your audience know you’re here. Since the platform is significantly different from Facebook, Twitter, or Instagram, you’ll need to try some new techniques to get more Snapchat followers.
There are a few different ways to spread the news.
Cross-promote your Snapchat username
If you have gained a loyal following on other social media platforms, let those users know you’re now on Snapchat. Schedule posts on Facebook. Or schedule Tweets that let people know you’re on the scene.
Share your profile link
Snapchat lets you share a unique profile link to connect your customers to your brand.
To get your link, navigate to your profile then click on your Snapcode on the left side. This will bring up a menu of ways to share your profile.

Click Share My Profile Link and copy the link, or share it immediately to another social account.
Create a custom Snapcode
A Snapcode is a badge that people can scan using their phone or tablet. Scanning this helps Snapchatters find you easily and quickly and gives your brand added recognition. It works much like a QR code.
Snapcodes also let users find your brand’s unique filters, lenses, and content.
To create a Snapcode:
- Click on the settings icon in the top right-hand corner when in your business’s Snapchat account.
- Select ‘Snapcodes’ from the dropdown.
- Choose Create Snapcode, and add your URL

In the same spot, you’ll also see that you can create other Snapcodes and connect with other users via their Snapcodes.
For example, taking a photo of Teen Vogue’s Snapcode will direct a user to their Snapchat content. The Snapcode will collect under Scan History or Scan from Camera Roll in your Snapcode settings.
Add the Snapcode or URL to your marketing materials
This could include your website, your email signature, your newsletter, and more.
Know that a Snapcode doesn’t have to be viewed on a screen to work. You can add your business’s Snapcode to marketing merchandise as well. Snapchatters can use their device to find you on Snapchat even if they scan your code from a T-shirt, a tote bag, or a business card.
Have an effective marketing strategy in place
Snapchat might not be a fit for every brand. As mentioned earlier, Snapchat is used mostly by individuals under the age of 35 and is known for being a playful platform.
But if that sounds right for your brand, have a clear social media strategy in place before creating your account.
- Research your competitors. Are they using Snapchat? What are they doing effectively on Snapchat?
- Outline your objectives. What is your brand hoping to achieve by being on Snapchat? How will you measure success?
- Create a content calendar. This will help you know when to post content, what content to post, and how much time to spend interacting with your followers.
- Determine the brand’s look and tone. Plan ahead so that your Snapchat presence looks consistent and is in keeping with your brand’s presence elsewhere.
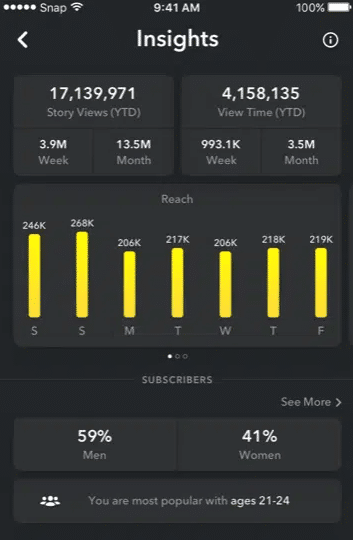
Know who your audience is and track Snapchat metrics
Use Snapchat Insights, the built-in analytics tool, to see who is viewing your content, understand what content is performing well, and drive a Snapchat strategy that works.
Source: Snapchat
You’ll be able to track important metrics that will help your Snapchat business strategy, like:
- Views. See how many story views your brand gets per week and per month. Also see how much time users spend viewing your stories.
- Reach. See how many Snapchatters your content reaches each day. Swipe through the carousel and also see the average view time and story view percentage.
- Demographic information. Understand the age of your audience, where in the world they’re based, and information related to their interests and lifestyle.
Interact with other users on Snapchat
On Instagram, Twitter, or Facebook, brands’ content is mixed in with posts from users’ friends and family. This isn’t the case on Snapchat. Here, content from friends and content from brands or content creators is separated.
Because of this split-screen design, you’ll need to engage to maintain a presence. Engage on the platform by:
- Viewing Snaps and stories created by others.
- Following other Snapchatters.
- Collaborating with brands or creators.
- Viewing any Snaps sent to you.
- Respond to Snaps and instant messages sent to you.
- Plan to create content regularly. Once you’ve used Snapchat Insights to learn when your audience is on the platform, post at those peak times.
Use Snapchat’s many features to create engaging content
Snaps are designed to disappear, but there is a lot you can do to elevate a simple image or video to make it engaging.
To help your content stand out from other brands’ content in Snapchat’s Discover section, make use of the following features:
- Draw over a Snap
- Write captions over Snaps
- Collect multiple Snaps to tell a narrative
- Add information like the date, location time or temperature
- Add background music to Snaps
- Incorporate polling
- Add a Snapchat filter (or several) to a Snap
- Add a Snapchat lens
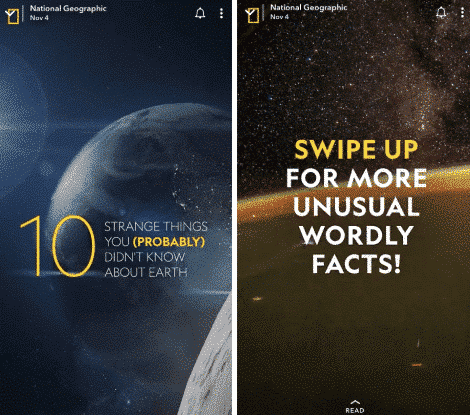
For example, publishers like National Geographic create Stories by compiling Snaps to share information like one of their articles would. Their Stories also encourage Snapchatters to click through to the website to read more once the Story is complete.
Make the most of sponsored AR lenses
Snapchat’s artificial reality (AR) lenses change the way users experience the world. Simply, they superimpose digital effects, animations or graphics on top of a real-life image.
Plus, Snapchatters can interact with the superimposed image — the AR effects move as your real-life image moves.
Considering over 800 million Snappers engage with AR, creating a sponsored lens that reflects your brand can be an effective way of using Snapchat for marketing.
AR lenses are made using the free software Lens Studio. To date, more than 2.5 million lenses have been created using the Lens Studio.
To create a sponsored AR lens in Snapchat’s Business Manager:
- Design your artwork in a 2D or 3D software.
- Import it into Lens Studio.
- Make sure you’re following Snapchat’s lens specification guidelines. As you’re creating a lens for marketing purposes, be sure the lens displays your brand’s name or logo.
- Animate the artwork with effects in Lens Studio.
- The lens will be reviewed by Snapchat before it is available to the public.
- Once it has been approved, publish and promote your unique lens.
By creating your own AR lens, you’ll reach Snapchatters looking for new, fun lenses to play with and interact with. This also boosts recognition of your brand.
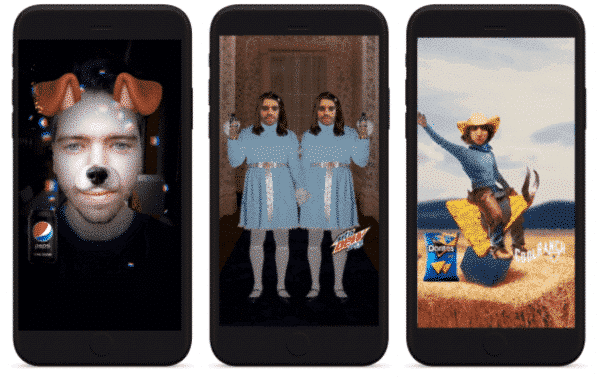
For example, for the 2020 Super Bowl, brands like Mountain Dew, Doritos, and Pepsi created sponsored AR lenses for Snapchat. These lenses were extensions of their TV ads that played during the Super Bowl, created to reach a wider audience.
Design a sponsored geofilter
Geofilters are a simple overlay for a Snap. They are available to users within a specific area and for a specific amount of time.
A filter could include the addition of an emoji or a designed sticker, include location information, or change the color of a Snap.
As well as using filters that already exist on the platform, you can create a filter specific to your business.
To create a branded filter:
- Log in to Snapchat’s Create Your Own.
- Create the filter. Maybe you add your business’s logo, text detailing a special product launch or event, or other elements.
- Upload the final design.
- Choose how long you want your filter to be available. Select a start date and an end date.
- Choose a location that your filter will be available in. Snapchatters will only be able to use the custom filter if they are within the area you’ve set. This is called a geofence.
- Submit the request to Snapchat. The cost will vary depending on how long the filter is available for and how large the geofence is.
- Typically, filters are approved within three hours.
Advertise on Snapchat using its various ad formats
To make the most of using Snapchat for business, you might want to plan to incorporate its various advertising formats into your strategy.
The numerous ad formats available include:
- Snap ads
- Collection ads
- Story ads
- Dynamic ads
As well as raising awareness of your brand and its products, investing in these different ad formats can drive users to your website and encourage purchases.
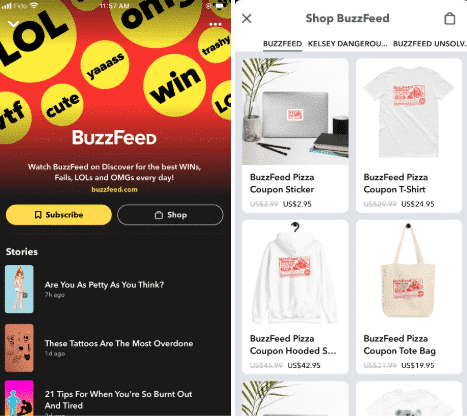
For example, Buzzfeed uses the Shop feature, which directs Snapchatters to its product catalog.
Target ads to a specific audience
With a Snapchat Business account, you can set specific filters so your ads will reach specific audiences.
This can help you reach Snapchatters who are already interacting with your brand. But it can also help you reach a new audience.
For example, you can target your Snapchat ads to a lookalike audience. That means Snapchat helps you reach people who might be interested in your brand because of their similarity to other Snapchatters who are already interacting with your brand.
You can also target ads by the age of the user, by their specific interests, or by their previous interactions as a customer of yours.
Stay up-to-date with the latest Snapchat business features
Snapchat has introduced several new features recently. They’re creative and quirky. And might not all be a fit for your business’s social media strategy.
Use AR shopping lenses
Snapchat recently made it possible for users to buy products directly from your Snaps. New Shopping Lenses let you tag products within your content, so users can easily browse, interact, and purchase directly from your catalog.
According to Snapchat, 93% of Snapchatters are interested in AR shopping and AR lenses are interacted with more than 6 billion times per day.
Learn more about Snapchat Shopping Lenses here.

Source: Snapchat
Snaps in 3D
Another exciting Snapchat feature is the 3D camera mode. This feature makes your Snap come alive by giving it that additional dimension. When users wiggle their phones, they experience that 3D effect.
This could be a useful feature for brands showing off new products or to show more sides to a product than a traditional photo can.
Custom Landmarkers
One of Snapchat’s most recent features is the addition of Custom Landmarkers. This AR lens allows users to build location-based lenses that only work in a specific area.
Originally, this feature was aimed at world-renowned sites like the Eiffel Tower and London Bridge. But today, Snappers can create a Custom Landmark anywhere, including storefronts, businesses and more.
For brands, Custom Landmarkers let you build a location-based lens at your store, pop-up, or any spot that means something to you and your fans. This gives your audience added incentive to visit you and see your special lens.
Here’s a short video describing the early days of Landmarkers.
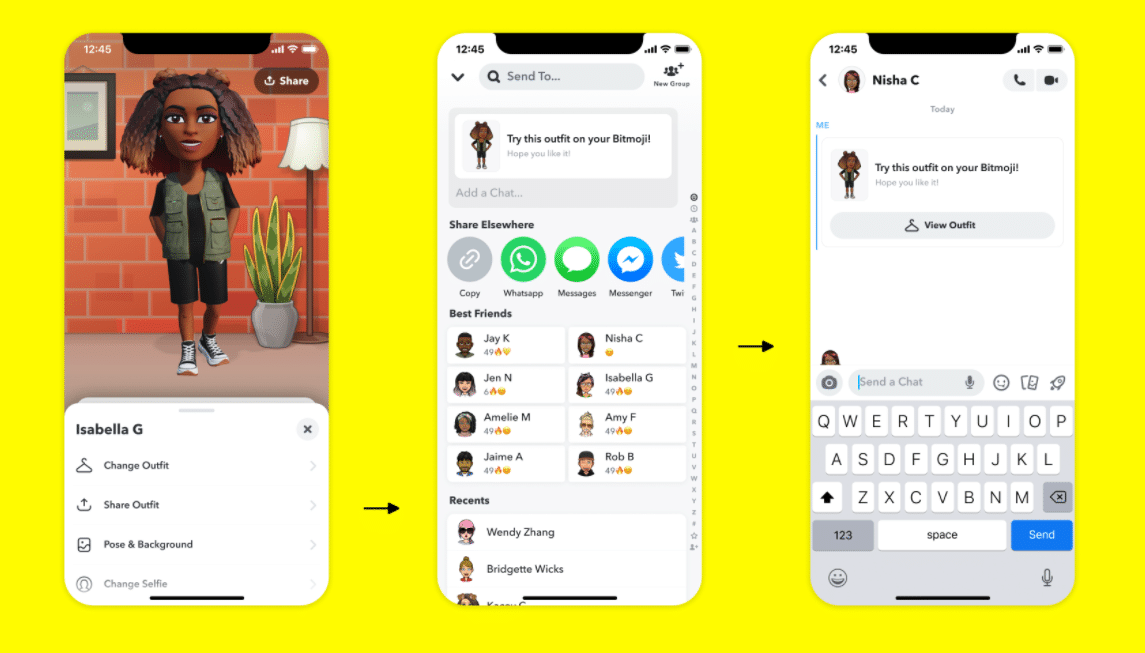
Bitmoji branded outfits
Ever wanted to trade closets with your Bitmoji? Then this is the feature for you.
Brands across the world are getting excited about the new Snapchat Business feature Bitmoji outfits. This quirky integration lets your Bitmoji wear clothes from globally recognized brands, including Ralph Lauren, Jordans, Converse, and yes… even Crocs.
What’s more, Snapchatters can also share their favorite Bitmoji outfit with a friend, using the all-new Outfit Sharing feature.
Brands who get a slice of this pie can have their product worn, shared, and celebrated in the virtual world.
To use Outfit Sharing:
- Navigate to your Snapchat profile and tap your avatar
- This will open your customization menu. From there, click Share Outfit.
- Choose the friend you want to share with, and you’re done!
Source: Snapchat
Make it easy for users to contact your business
Snapchat now offers Swipe Up to Call and Swipe Up to Text features for Snapchat business users in the US.
This feature might be the most obvious one for brands to adopt. As well as being able to swipe up to visit a business’s website or download an app, Snapchatters can also swipe up to call or text the business from their mobile device.
Source: Snapchat
Considering users are 60% more likely to make an impulse purchase on this platform, this is another way to prompt Snapchatters’ buying decisions.
Now that you know some of the benefits of Snapchat for businesses, how to get your Snapchat Business Account set up, the features your business can incorporate on Snapchat, and how to leverage Snapchat ads, it’s time to make the most of this platform for marketing your business.
Start snapping!