
Key Takeaways
- Before diving into TikTok marketing, make sure your target audience is on the platform. With over a billion users, it’s likely they are, but understanding who they are and what content they engage with is crucial.
- TikTok is all about creativity. Whether you’re using influencer marketing or crafting organic content, make sure it’s engaging and authentic. Don’t be afraid to experiment and see what resonates with your audience.
- While quality matters, TikTok also rewards consistency. Posting regularly (aim for 3-5 times a week) helps you stay visible and relevant in your followers’ feeds.
- TikTok’s built-in analytics tools are your best friend. Regularly check your performance metrics to see what’s working and what’s not, then tweak your strategy accordingly.
- TikTok popular trends can be powerful, but don’t force it. Make sure your content aligns with your brand voice and feels authentic to your audience. If something doesn’t work, learn from it and move on.
Alrighty, team. It’s time to sell out on TikTok. Literally: let’s use TikTok marketing to boost sales for your brand. TikTok ads have the potential to reach over 945 million users aged 18+.
In general, TikTok is one of the best social media channels out there for businesses to reach millennial and Gen Z investors.
So, what exactly does digital marketing on TikTok look like?
TikTok marketing varies widely from brand to brand and from industry to industry. A leisurely scroll through the app will yield standard advertisements.
In this blog post, you’ll find an intro to TikTok for businesses, advice for building an excellent TikTok marketing strategy, examples from social media-savvy brands and a list of tools to add to your TikTok belt.
Here’s how to market on TikTok.
What is TikTok marketing?
TikTok marketing is the practice of using TikTok to promote a brand, product, or service. This can include different tactics like influencer marketing, creating viral organic content, and leveraging user-generated content to boost engagement and authenticity.
TikTok marketing can help businesses:
- Increase brand awareness
- Build engaged communities
- Sell products and services
- Get feedback from customers and audiences
- Provide customer service
- Advertise products and services to target audiences
What is TikTok influencer marketing?
TikTok influencer marketing involves businesses partnering with creators to promote their brand. Companies will connect with influencers and agree upon a business arrangement in which payment (or goods or services of value) is exchanged for content. For example, a kitchen brand might pay a foodie influencer to post a TikTok promoting their blender.
Influencer marketing can be more subtle, too, like this product placement in this creator’s video.
@spencer.barbosa Shaving is a choice…MY CHOICE. I love @Billie because they empower women to believe that shaving is their choice 🫧🧖♀️You must try the Billie Starter Kit and shaving gel available at major retailers across Canada #girls #relatable #BillieCAPartner #ad #bodyhairpositivity ♬ original sound – spencer barbosa🧚🏻
Source: @spencer.barbosa
Influencer marketing is everywhere—Bretman Rock is promoting hair products and Emily Mariko is promoting her own tote bags. But don’t be fooled: finding the perfect match for your brand is tricky, and it’s important to do all the research you can before committing to a creator.
What is TikTok affiliate marketing?
While the influencer marketing world can be a bit like the wild west (there’s no real rules beyond marking content as sponsored), affiliate marketing is an official, platform-sanctioned marketing strategy for businesses.
First: what is affiliate marketing? In affiliate marketing, creators promote products and then earn commission off of sales. You’ve seen it before: when an influencer says something like “Use the code Alyssa20 to get 20% off these shoes,” that’s affiliate marketing. The brand can tell how many sales the influencer made by looking at how many times the coupon code was used, and that influencer is compensated accordingly.
TikTok’s affiliate marketing can help connect you with creators and will keep track of all of the sales made for you—in fact, the platform will even pay the creator for you.
TikTok offers three different affiliate marketing options:
- The Shop Plan. Tiktok’s simplest affiliate marketing plan: you set a flat commission rate for all of your products. For example, creators get 5% of sales they make on any product.
- The Open Plan. In this plan, the business can set different commission rates for different products (and it’s open to all creators)
- The Targeted Plan. This option allows you to invite specific creators to promote specific products.
A step-by-step guide to getting started
First thing’s first: to do any marketing on TikTok, you’ll need a TikTok Business account (don’t worry, it’s free).
Tiktok business accounts include features like an email button, access to the business creative hub and commercial music library, options to add calls to action, auto-replies for DMs and more.
For more tips on using TikTok effectively, check out this guide on TikTok advertising.
If you already have a personal TikTok account, it’s easy (and again, free) to switch it to a business account.
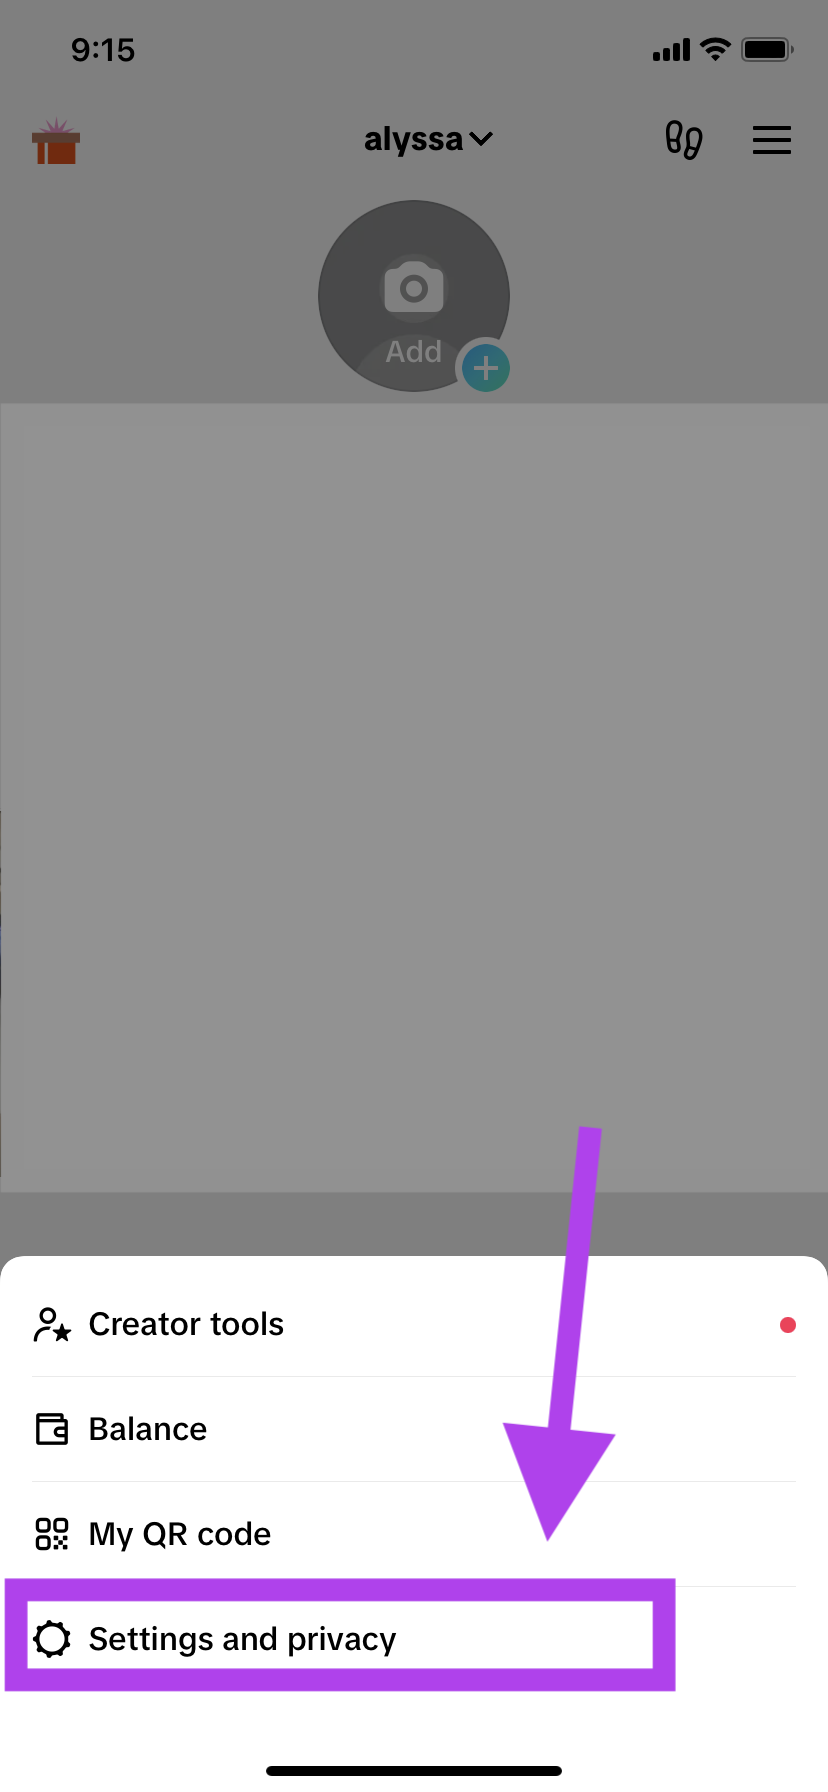
First, go to your profile and tap the menu button—that’s the three horizontal lines in the top right corner.
Then, hit Settings and privacy.
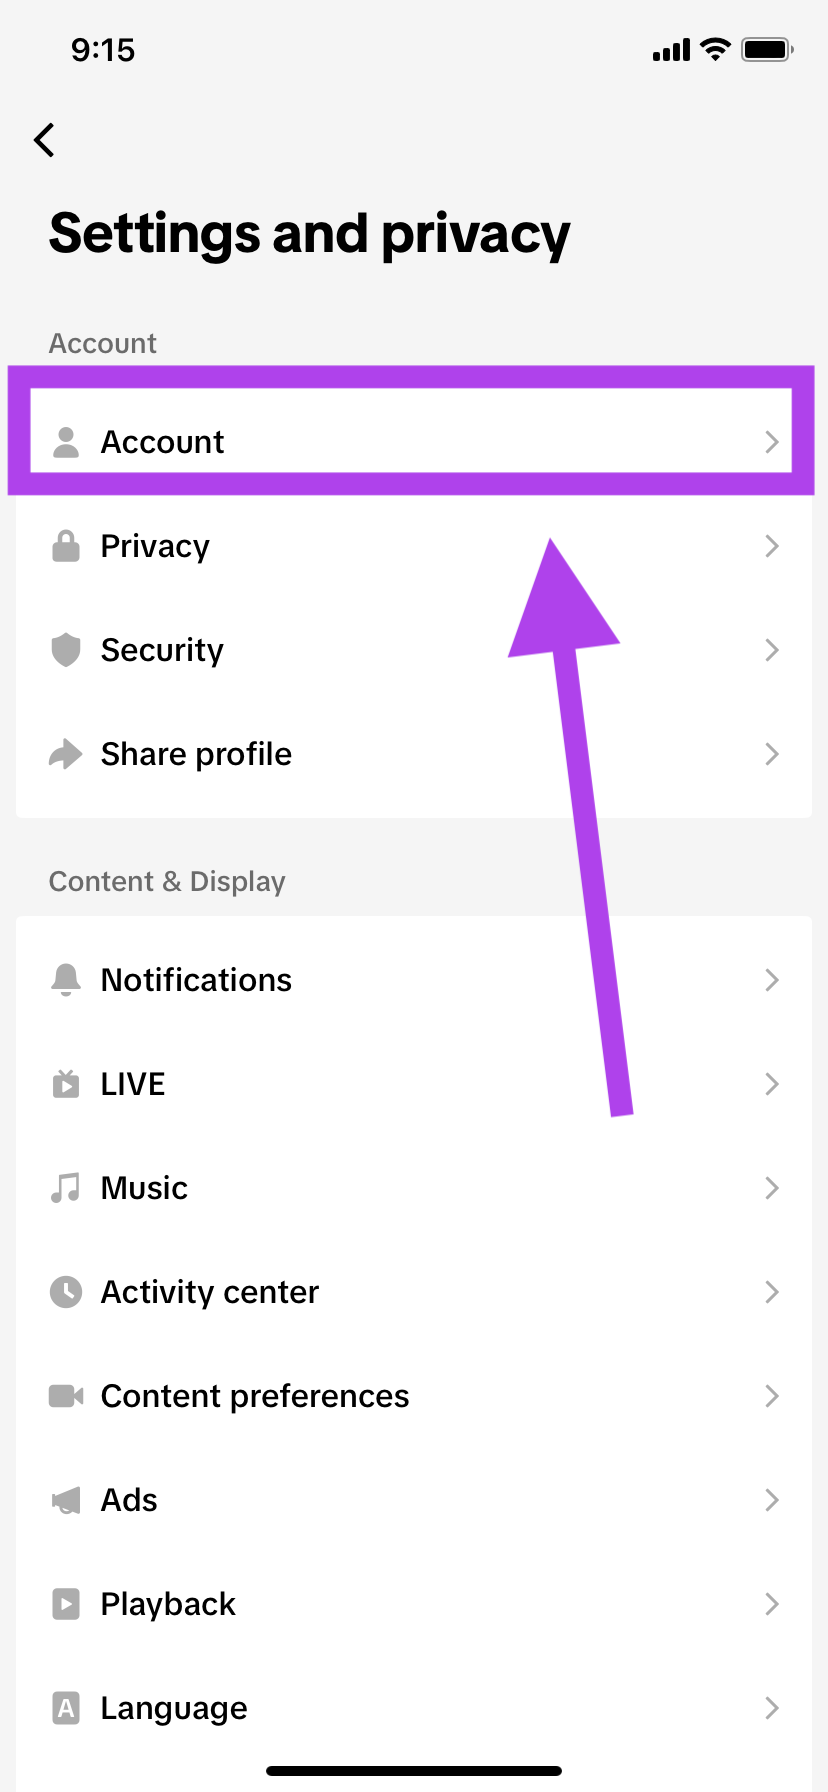
From there, select Account.
Next, tap Switch to Business Account.
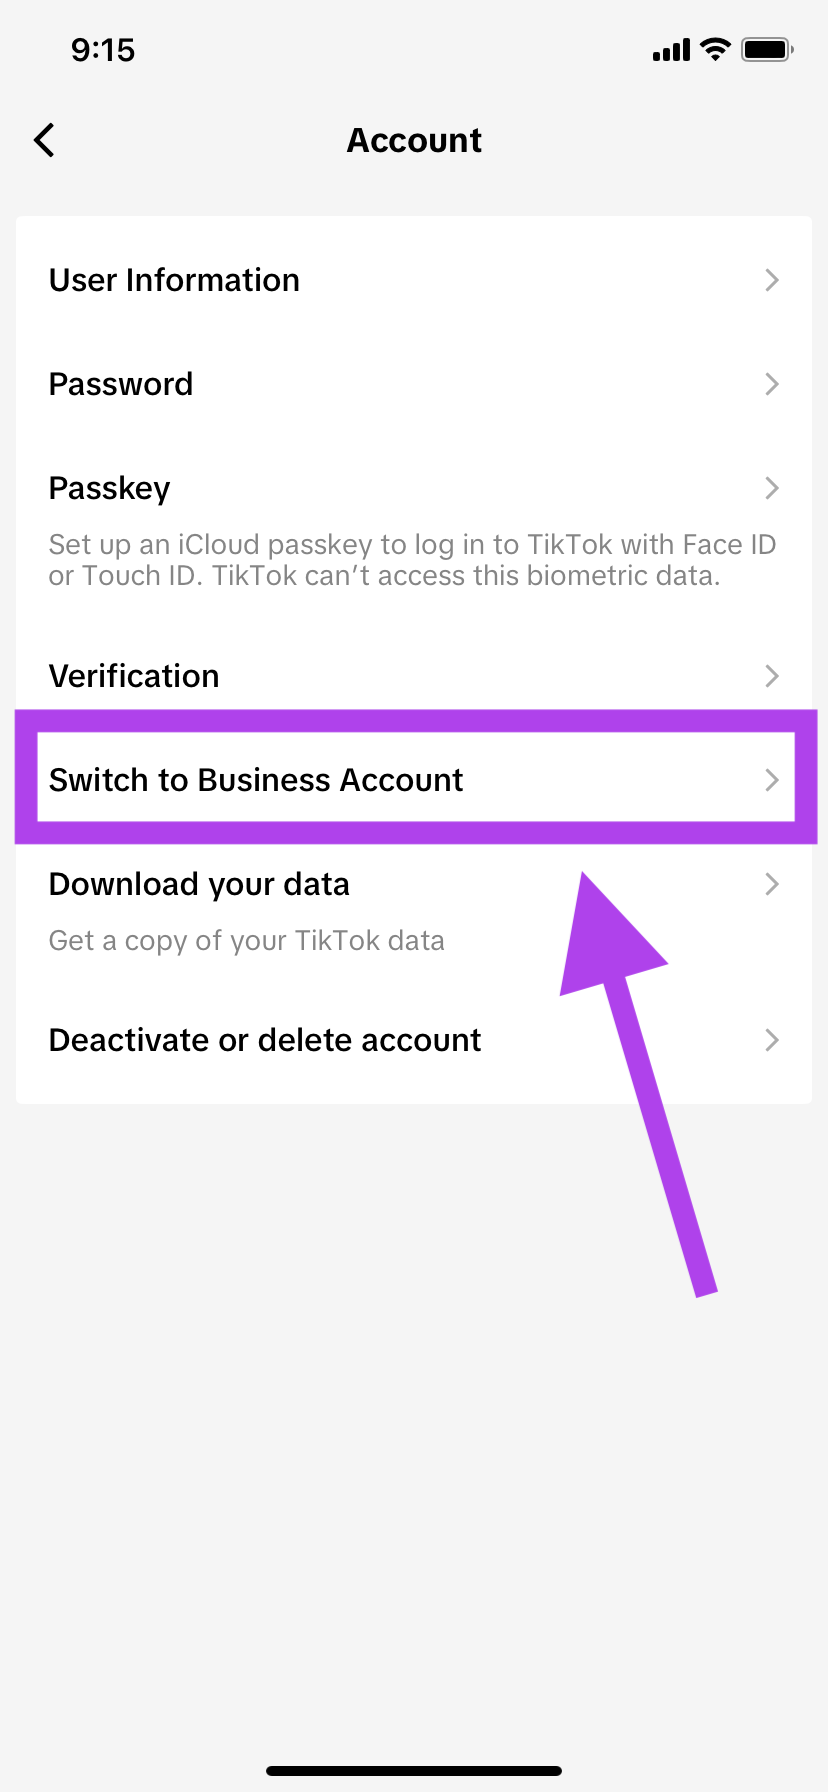
Ta-da! Welcome to your shiny new TikTok business account. When you first switch, the social media platform will take you through some of the features of a business account to help get you started.
How to create a TikTok marketing strategy
Now that you have a business account, it’s time to get down to… well, you know.
Get to know the platform
Yes, it’s part of the work, we swear!
Spending some time getting sucked in by TikTok videos (beginners, start here) is essential to understanding the platform. You can’t create engaging content for TikTok if you aren’t up-to-date on what’s engaging.
Explore the different features available on the TikTok app, and note what challenges, editing styles and sounds are trending.
Read up on the TikTok algorithm, too. Understanding how TikTok ranks and displays videos in the For You tab can inform your content, hashtag and engagement strategy.
Get the full lowdown on how the algorithm works here. You can also brush up on all things TikTok by taking courses in the TikTok Business Learning Center.
Research your audience
Here’s a question to ask before you get in too deep: is your audience even on TikTok? Since the app has over a billion global active users, the answer is probably yes (unless you’re eyeing business in India, because that country has banned the app since 2020). Still, it’s important to research your target audience to make sure that TikTok is right for you.
Before you start creating content, learn about TikTok demographics and identify those who might be interested in following you.
Tiktok has a rep for being popular with teens, but the platform’s user stats may surprise you: about 32% of TikTok’s global active users are between the ages of 25 and 34. But it is true that TikTok’s younger users are loyalists — 76% of American social media users between the ages of 18 and 24 use the app. In fact, one Google exec even admitted that 40% of GenZers are more likely to use TikTok than Google when looking for a place to go for lunch.
Once you’ve zeroed in on a potential audience, research what types of content they like and engage with. Then start to brainstorm content ideas for your brand.
Perform a competitive audit
Not everything’s a competition… but marketing on TikTok sure is. Are your competitors on TikTok? If they are, you could be missing out on the action. If they aren’t, TikTok may be a way to gain a competitive advantage.
Whether or not your competitors are on the platform, find at least three to five similar brands or organizations and see what they’re up to. If it’s helpful, use the S.W.O.T. framework to identify each competitor’s strengths, weaknesses, opportunities, and threats.
Because TikTok is a creator-led platform, don’t rule out including influencers in this exercise. Find personalities that specialize in your area of expertise.
Learn more in our complete guide to running a competitive analysis on social media (free template included).
Set goals that align with your business objectives
You can create TikToks just for fun, but it’s better to have goals in mind that can be tied to your overall business objectives.
Whether you plan to reach a new audience, improve brand image, promote awareness for a product or develop stronger customer relationships through engagement, it’s important to back your efforts with a rationale.
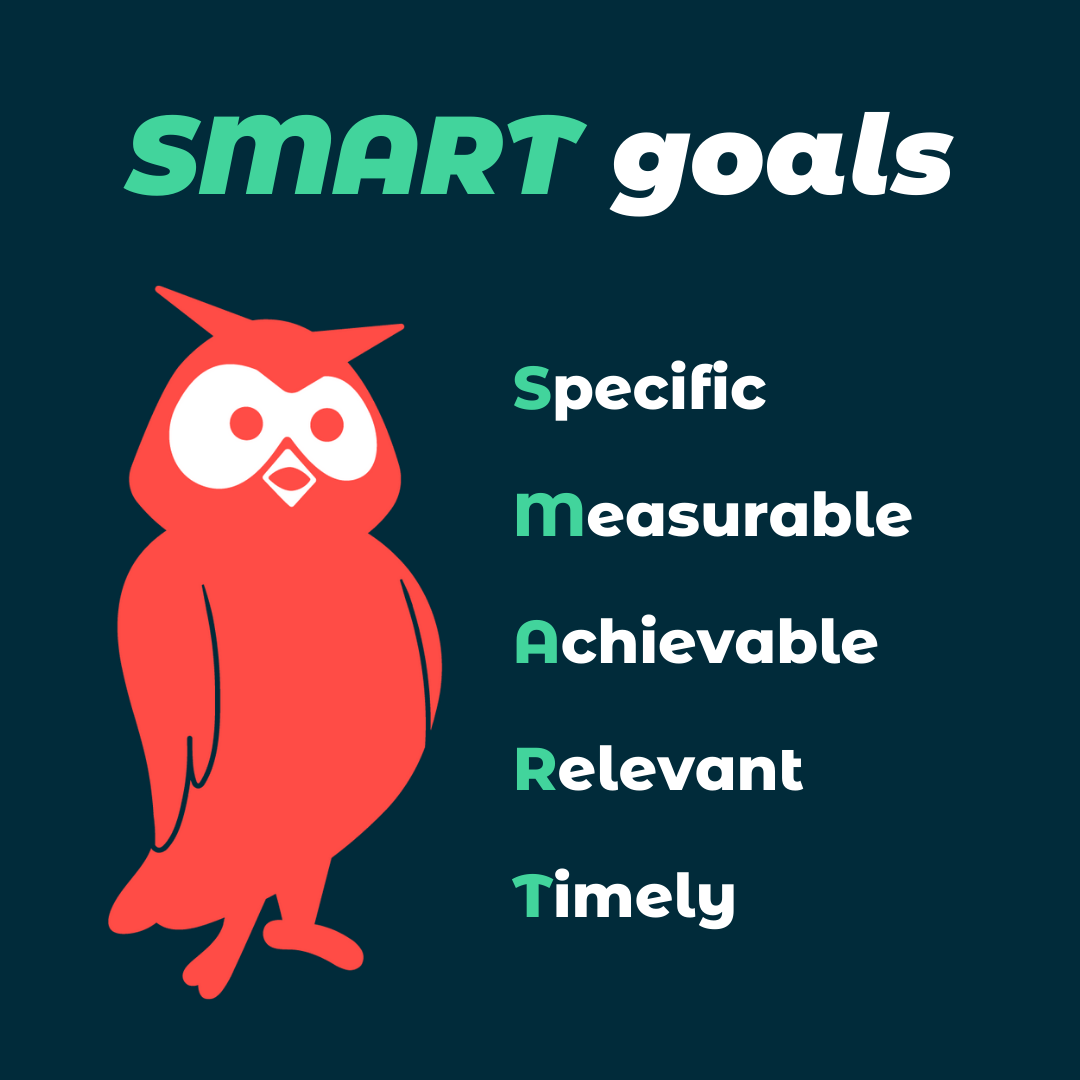
Consider using the S.M.A.R.T. goal framework to set goals that are Specific, Measurable, Attainable, Relevant, and Timely.
Like most social platforms, TikTok provides analytics for Business accounts.
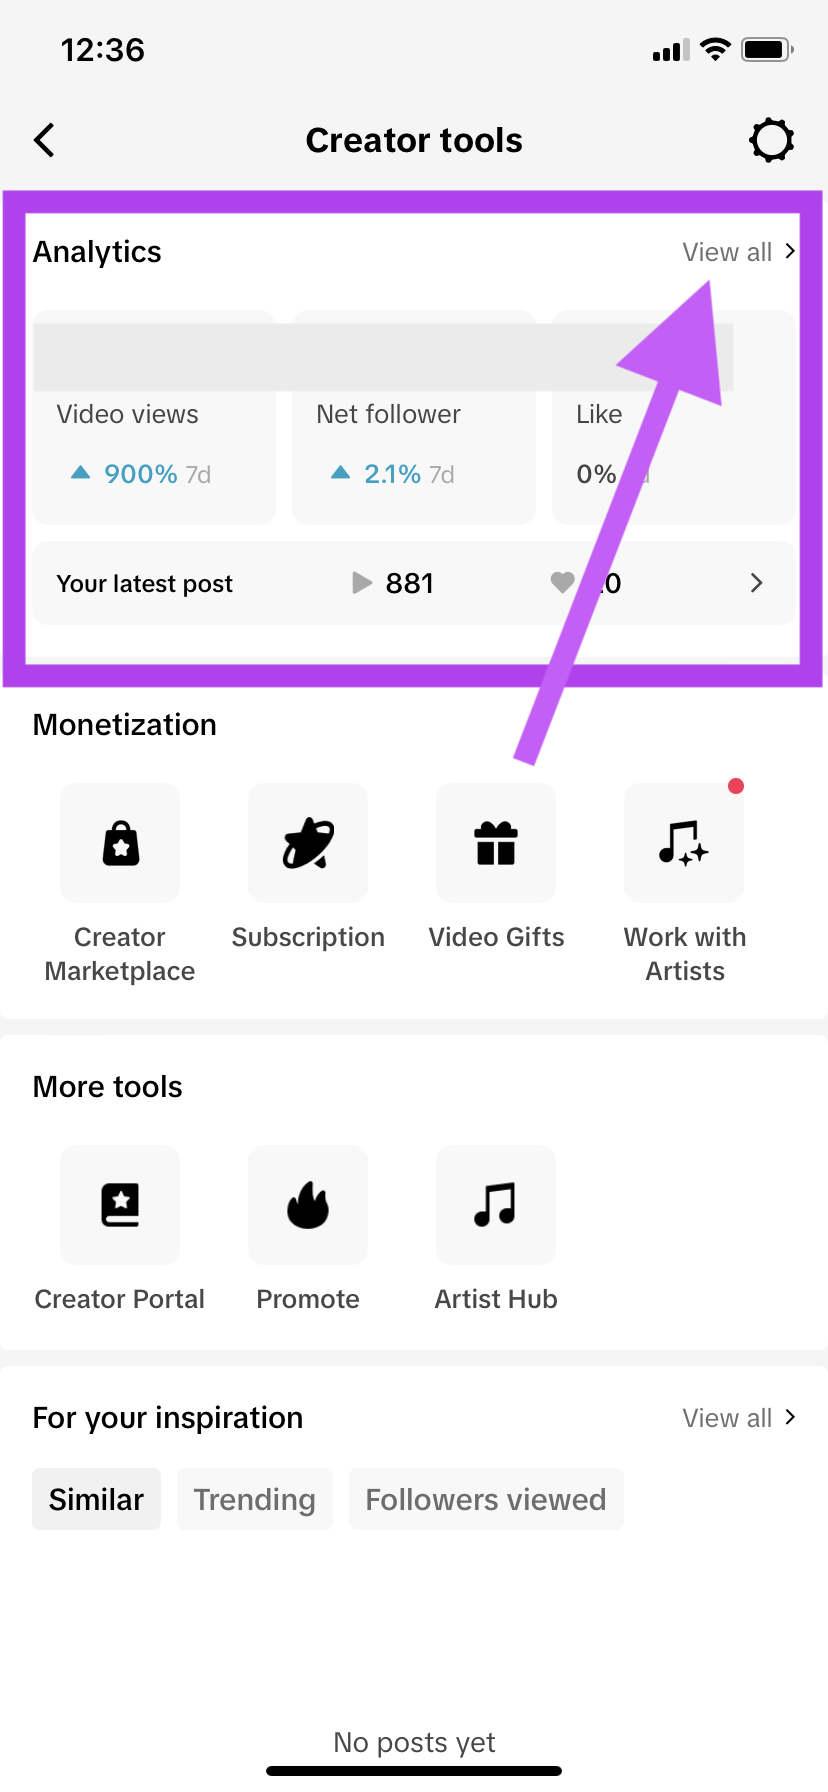
To access your TikTok analytics, go to your profile and select the menu button (the three horizontal lines in the top right).
Then, select Creator Tools.
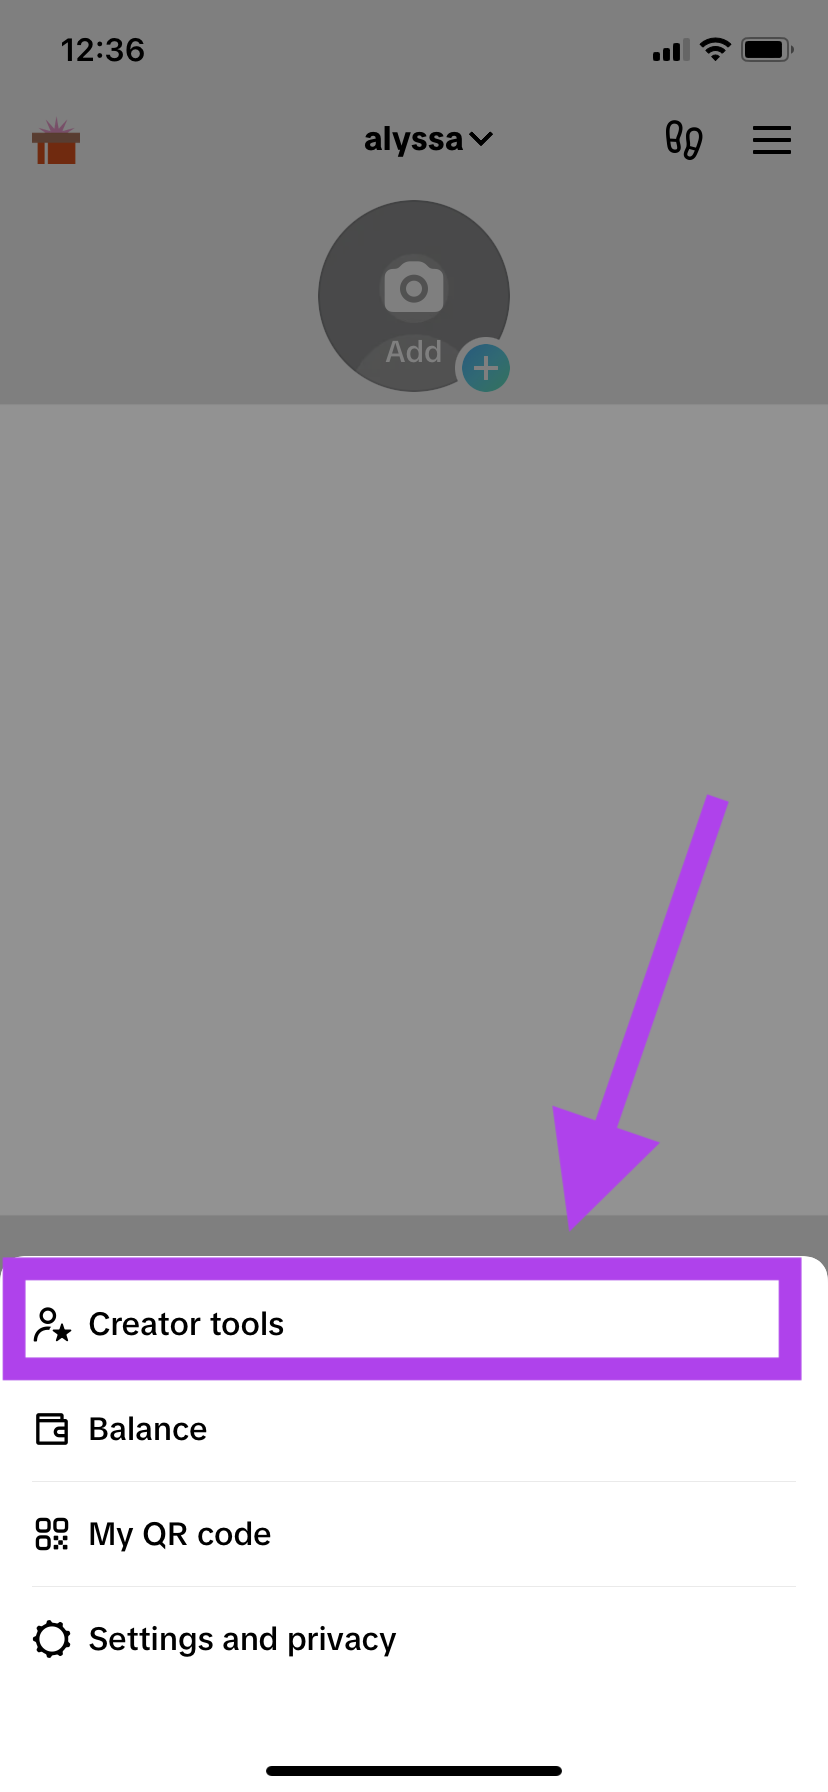
A snapshot of your analytics will open automatically. To see a more in-depth review of your metrics, select View all.
Unsure how to interpret the numbers? Read our complete guide to TikTok Analytics.
Post regularly
Quality over quantity, of course… but on TikTok, quantity also matters. TikTok recommends posting one to four times per day. We can hear your sigh of defeat from here—don’t stress. For most social media managers, TikTok’s recommendation just isn’t reasonable: start with 3 to 5 videos per week.
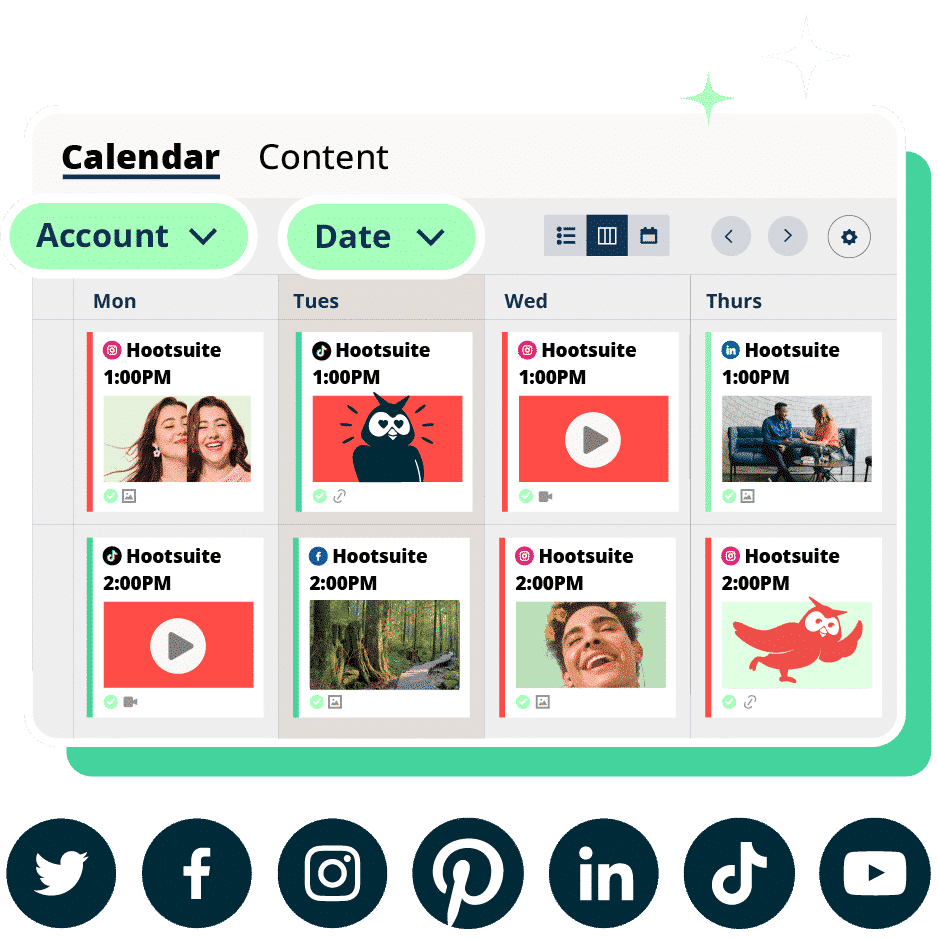
Making a content calendar—and sticking to it—is key to a successful social media strategy. Your TikTok content calendar will look similar to a real-life calendar, but instead of “Dinner with Dad” and “Dog’s Half-Birthday” you’ll plan things like “Go Live” or “Post Sale Announcement.” There’s plenty of tools out there to get you started (we’ve created a free social media calendar template).
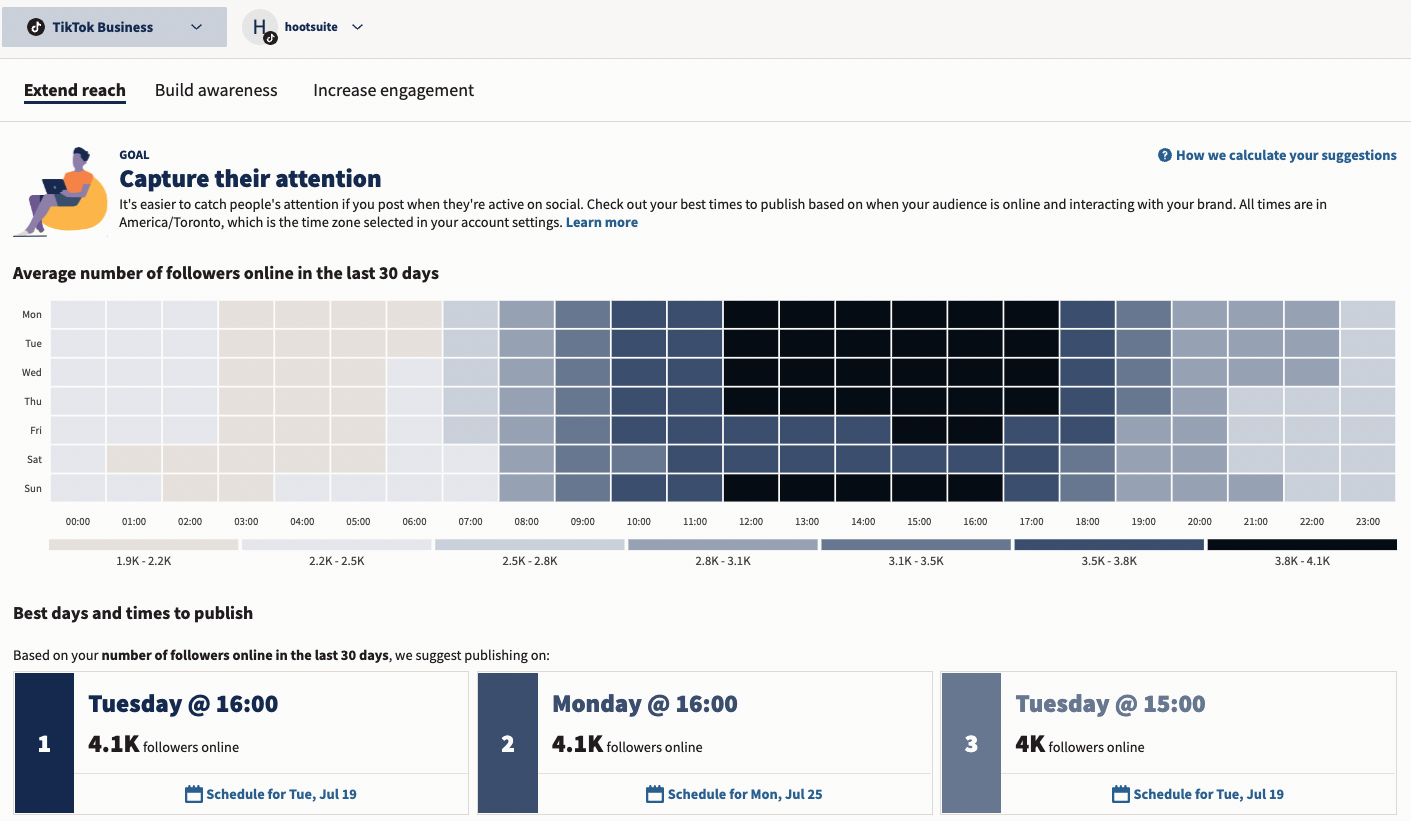
Schedule your posts for maximum views
TikTok’s algorithm prioritizes newer content, so it’s always best to post your TikToks when the majority of your audience is using the app. That magic time varies across industries, of course, but based on Hootsuite’s experiments, the best overall time to post is Thursdays at 7:00PM.
You do you, though—here’s a video that will help you find the best time to post for your specific audience.
You don’t actually have to be online in order to post a TikTok thanks to scheduling platforms like Hootsuite. Here’s a guide on how to legitimately schedule TikToks for later.
Pay attention to your analytics
Analytics aren’t just the perfect starting point for marketing on TikTok: they’re also an easy way to gauge whether or not your strategies are working. Check in at least once a month and see if you’re reaching your goals (and treat yourself, of course).
Create space to experiment
There’s no such thing as a formula for going viral on TikTok (but you can follow our tried tips to increase your odds).
Leave space in your TikTok presence to be creative, have fun, and go with the flow. Even political parties are embracing TikTok trends and not taking themselves too seriously. (Is this good for the world? It’s legitimately hard to say).
If something flops, learn from it and move on to the next experiment. If your brand ends up accidentally trending like Josh wine, make the most of it and keep “letting the memes flow.”
Be in on the joke. Don’t plan to be taken too seriously on TikTok.
Inspiring TikTok marketing examples
Start with a hook
We love a good hook. A social media hook grabs a viewer’s attention and convinces them that the content is worth experiencing. When that hook comes from a source that the audience trusts, even better.
Source: @kevikodra
In this TikTok, a makeup brand partnered with a makeup influencer to show off a product. It starts with a unique and intriguing hook (“This is the biggest rule I love to break. What if I told you regardless if you have dry skin or oily skin, I’m prepping everyone the exact same way”) and immediately shows the viewer the cleanser in action.
Why this works
- The video starts with a hook that will immediately captivate the target audience
- The brand partnered with an influencer that’s seen as an expert in their field, which helps to boost the brand’s credibility
- The video shows the product in action instead of just talking about how great it is (show, don’t tell!)
Encourage comments
The more engagement a TikTok receives, the better it will fare when it comes to the algorithm’s ranking. Metrics like comments, likes and saves will determine how good TikTok thinks your short-form videos are, so the more you can encourage them, the better.
Source: @smarties
Videos like this one are an awesome example of this—the business motivates the viewers to comment by asking a question, and also gives them the freedom to answer however they wish (“Wrong answers only” indicates a no-judgment zone).
Why this works
- The TikTok asks for comments straight up, encouraging audiences to interact with the content
- There’s lots of room for creativity and opportunity for followers to show off in the comments (and TikTok users love to show off)
- The brand is liking and replying to many of the comments, prompting further engagement with the video and connecting with their followers
Lean in to the algorithm
Because the TikTok algorithm is so difficult to master, sometimes anyone seeing your videos can feel like a miracle. Why not lean into that?
Source: @makeupmaddie
This creator-made video is awesome marketing for Pandora. The text (“This is your sign to go to Pandora”) indicates that the user coming across the video is pure luck. It gives direction, but isn’t pushy. The very appropriate (and very popular) Taylor Swift song also helps make this video feel authentic and personal.
Why this works
- The video suggests to viewers that they’re lucky to be seeing it; that the algorithm showing this video is “a sign”
- It clearly displays both the product and service being offered by showing an example of the step-by-step process of custom engraving
- The TikTok uses a trending song for the audio, making the video feel familiar and timely to the audience
Reply to comments with another TikTok
Comments play a major role in TikTok’s algorithm—the more comments a post gets, the higher that video will rank. And TikTok makes it quite easy for you to show commenters that you’re listening: just reply to a comment with a video.
Source: @truvellebridal
This TikTok from a bridal store was made in response to a comment on a video that showed a dress from the back only. The brand addresses the commenter directly and turns the response into more content (and another opportunity to show off the pretty dress).
Why this works
- By only showing the back of the dress in the first video, the brand encourages comments—come on, show us the front!
- Audiences are more likely to comment on your TikToks when you’re actively engaging with them: liking and replying to comments shows your followers that you care
- The brand is directly addressing a curious potential customer rather than just putting out an ad… in other words, they’re giving the people what they want
Show behind-the-scenes
TikTok audiences love authentic content. The more honest your marketing feels, the more likely viewers will be to trust you, and showing behind-the-scenes content is a fantastic way to humanize your brand and make your followers feel like they are taking the business journey along with you.
Source: @kovessentials
This TikTok doesn’t just show off the product (a claw clip with a bow attached), it explains part of the process of manufacturing. It opens the door to a not-often-shared part of the retail process, and all the imperfection and trial-and-error that goes along with it.
Why this works
- Audiences feel like they really know this product—after all, they saw a prototype and understand how the final result came to be
- The brand shows transparency by allowing viewers a peek at the design process
- The video is a satisfying watch, as you can see the prototype and the end product all in one video
Inspire shares
Not every marketing TikTok has to look like an ad—in fact, often just-for-fun posts will perform better than your strictly business content. So don’t count out those cute, funny or bizarre ideas…creating videos that users will want to share with their friends or family is half the battle.
Source: @peli.roja.pets
This TikTok doesn’t promote specific services or offerings from the business—a pet daycare company—but it does succeed in being adorable and very sharable. By showing puppies before and after being told that they’re a good boy/girl. This cute video prompts viewers to share the post with their partner.
Why this works
- The TikTok prompts audiences to share the video, which helps the video to rank higher in TikTok’s algorithm
- The video doesn’t come across as an ad, but it still promotes the business in a more subtle way
- Puppies are adorable and the internet loves them (and this video targets a specific emotional group: people who don’t have a dog but want one)
3 TikTok marketing tools for 2024
Hootsuite
Yes, we’re playing favourites, and Hootsuite is our preferred tool for marketing on TikTok.
Using Hootsuite, you can:
- Schedule all your TikToks in advance
- Write engaging captions with OwlyWriter AI and a built-in AI-powered hashtag generator
- Get personalized recommendations for the best times to post to reach more people on the platform
- Monitor and engage with comments
- Track your results in real-time
- Create custom reports to showcase your success
- Handle TikTok, Instagram, Facebook, Twitter, LinkedIn, YouTube, and Pinterest from one dashboard
Canva
When it comes to video design, Canva’s your guy. Canva is a dream for the aesthetic-minded: this powerful graphic design app allows you to edit photos, videos, marketing assets and more. It’s very user-friendly and comes with templates and millions of images and graphics built-in.
Psst: Hootsuite has a Canva integration, making designing even easier. For more TikTok design templates, mosey on over to this blog post… or, you can use Instagram Reels templates in a pinch.
Link Trees
As the platform grows, there’s more and more ways to make money directly from TikTok—but one marketing tactic that never fails is using TikTok to drive traffic and make sales. Think of TikTok like a bold, light-up arrow that points users towards your brand. And the best way to convert those views into sales? Using a link in bio.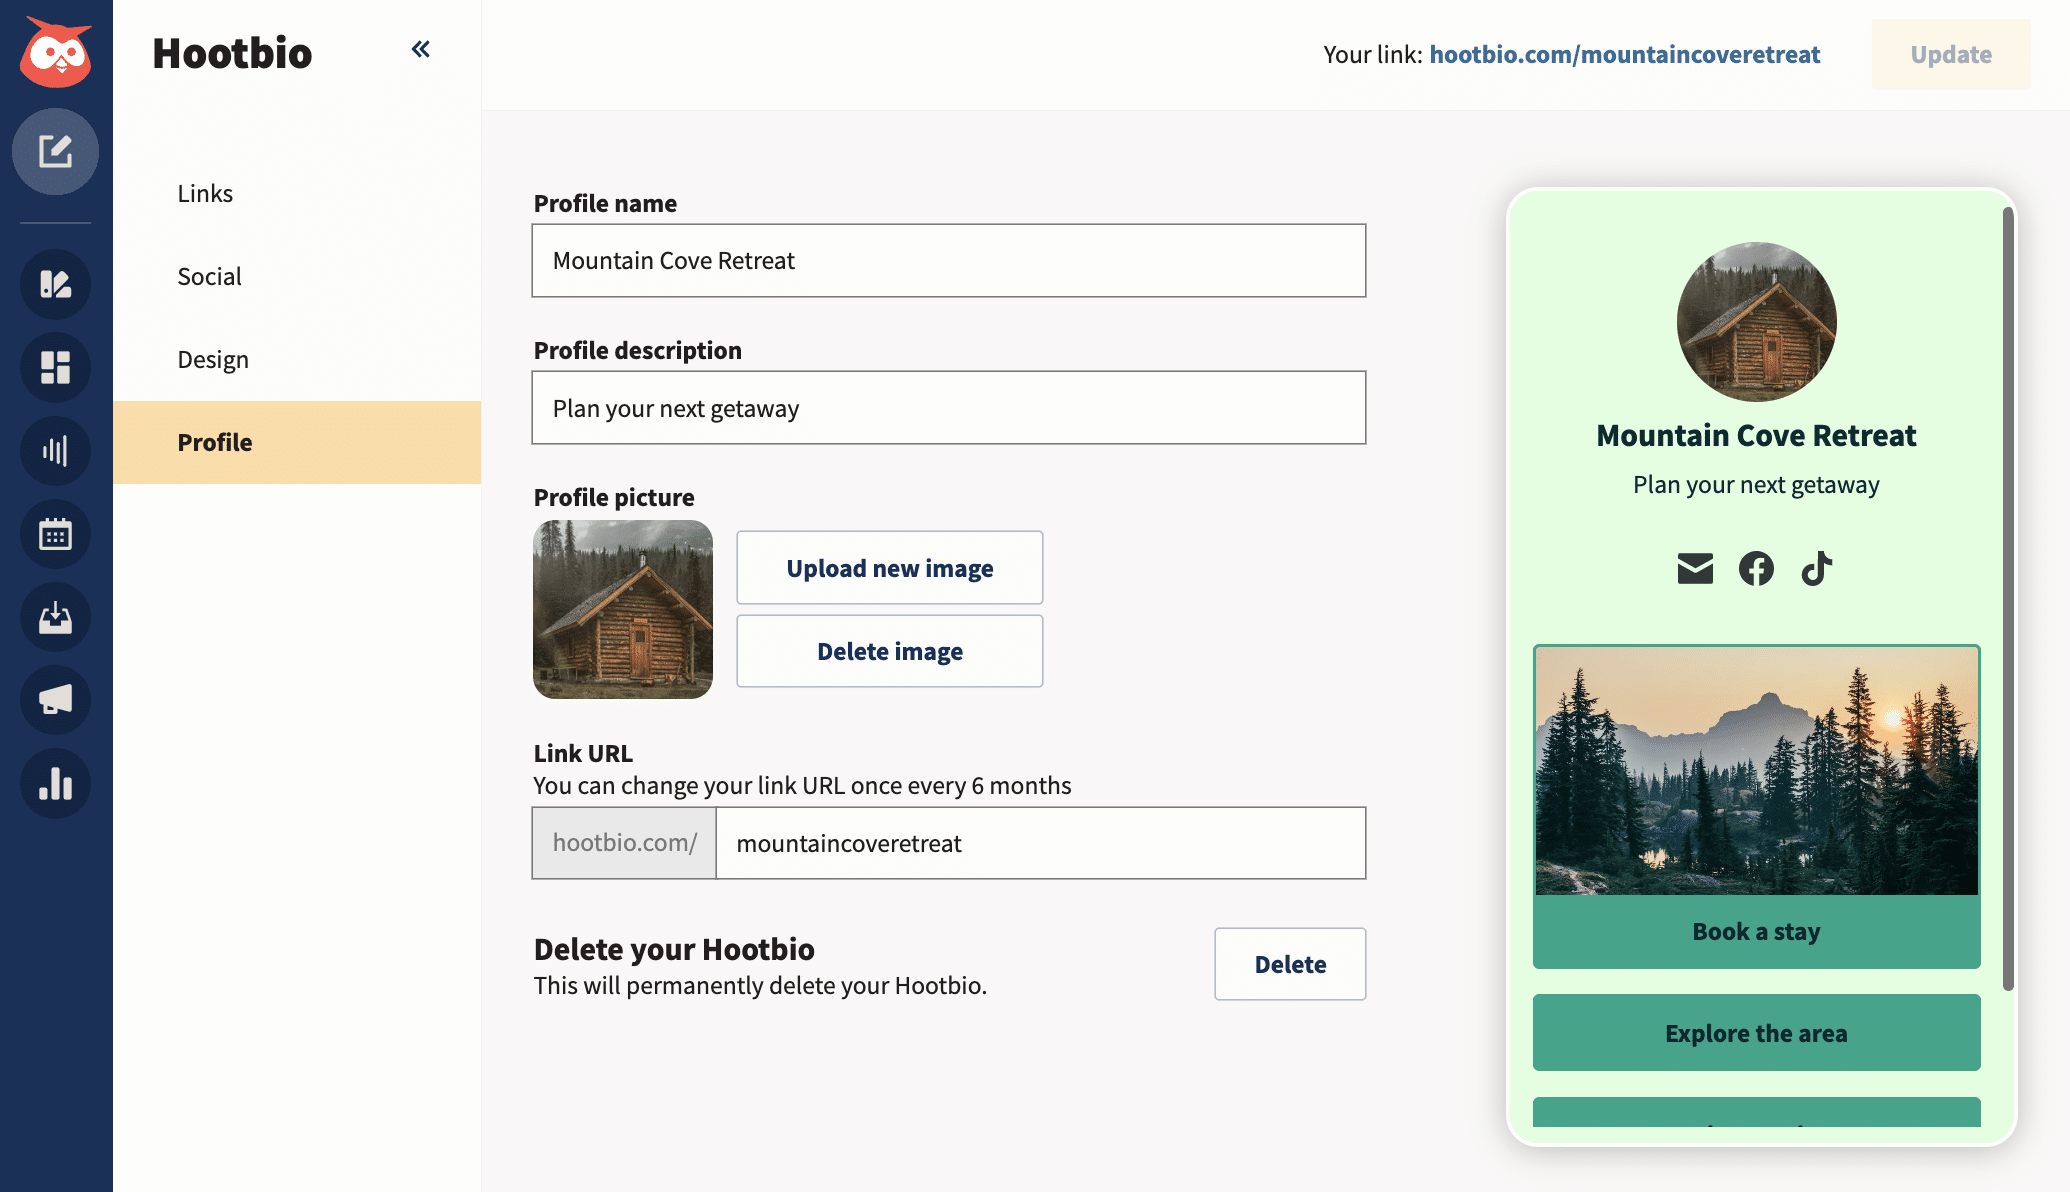
A link tree (like Hootbio!) will show TikTok users the way to your Youtube channel, e-commerce store, blog or just about any other external site. It’s a clever way to turn one link into a ton of opportunities.